Thursday, November 13, 2014

Stick-to-Your-Ribs Crockpot Stew

We had something rare blow into these parts of Texas yesterday, a cold front - an actual COLD front - not just one of those day-long, breath of fresh air kind of fronts that only leaves you wanting more. It's shivering weather. And when the thermostat approaches the freezing point, I start craving good, hearty foods.

And one such feel good food is stew. I had a few recipes in my binder, but they were from our pre-Paleo days and just wouldn't do. So I combined a few ideas, made a few substitutions, and came up with this:

Stick-to-Your-Ribs Crockpot Stew

Stuff You Need:
  • 2 lb. beef, cut into bite-sized pieces
  • ½ lb. Italian sausage
  • 1 yellow onion, cut into large chunks
  • 1 large zucchini, cut into large chunks
  • 1 orange bell pepper, cut into large chunks
  • 1 yellow bell pepper, cut into large chunks
  • 1 red bell pepper, cut into large chunks
  • 1 - 4 oz can tomato paste
  • 1 - 14 oz can diced tomatoes
  • 2 Tbs apple cider vinegar
  • 2 chipotles in adobo, finely chopped
  • 2 cups beef broth
  • 1 Tbs garlic powder
  • ½ tsp onion powder
  • 1 Tbs black pepper
  • ½ tsp cayenne
  • ½ tsp thyme
  • 1 tsp oregano
What To Do:
  1. Crumble sausage into a skillet and brown until no pink remains.
  2. Remove sausage by slotted spoon and drain on a paper towel-lined plate.
  3. Use reserved grease from sausage to brown beef. I like to do this in small batches to prevent excess water build up.
  4. Place beef and sausage in the crock pot.
  5. Next sauté the veggies in your skillet for a minute or two, stirring often.
  6. Place veggies in the crock pot.
  7. Use apple cider vinegar to de-glaze you skillet.
  8. Add beef broth, tomatoes, and tomato paste to the skillet, mixing until tomato paste fully incorporated.
  9. Add the dry spices and mix well.
  10. Pour liquids from the skillet to the crock pot.
  11. Cook on low for 8 hours.


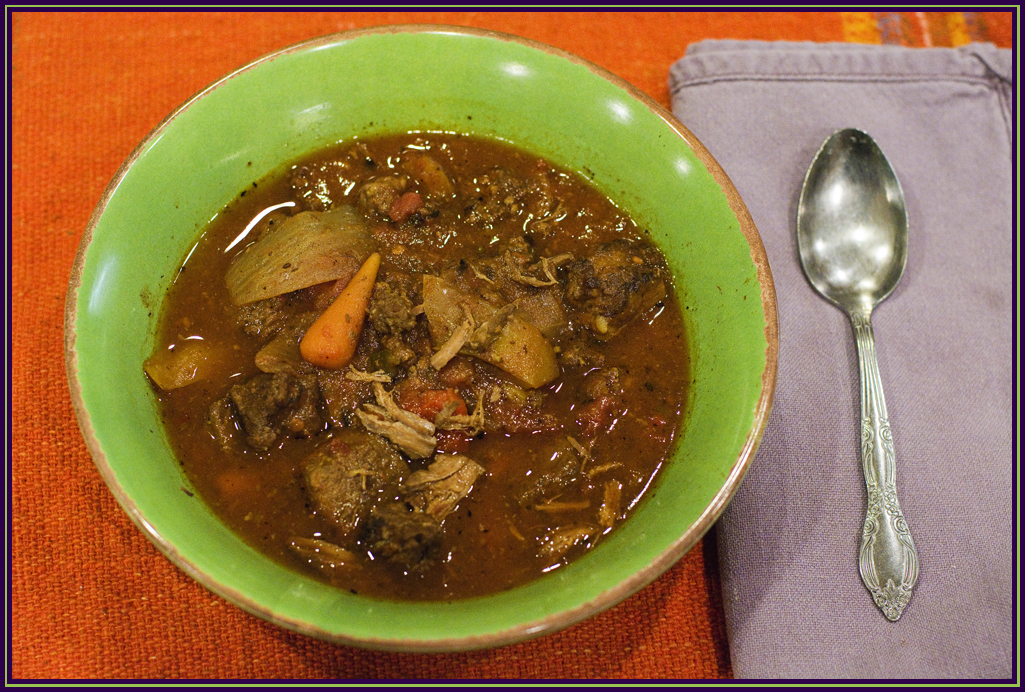
I can't tell you how comforting this dish has been. I have eaten it for lunch and dinner 2 days running. And I'm not TOO embarrassed to admit that I had it for breakfast today as well.

It's also a really versatile recipe. These are just the veggies we had on hand. If you've got something else around - sweet potatoes, okra, mushroom - whatever is on hand or whatever sounds good to you, just pop 'em in. Don't have Italian sausage handy, use ground beef or breakfast sausage or even chorizo. This is really one of those clean out the fridge kind of meals.

I sautéed all the veggies, but that is really a personal preference. Aside from browning the sausage and beef, you could get away with just dumping this all in the crock pot. And if I had been short on time, I likely would have considered that option. But, for a change I had some time on my hands, so I pulled out all the stops.

Regardless of the changes you make, I think you will find this a great cold-weater feel good meal!

Thursday, September 11, 2014

Orange Chicken

I guess I should start with lots of apologies. It's been AGES since my last post. And I have no real excuse. Sure, work is busy. But what else is new? I have been experimenting in the kitchen. Sometimes, it's just tweaks to a familiar dish, others it's a big leap of faith.

And such is the case with this particular dish.

You see ... I just love Asian flavors. And orange beef, chicken, and shrimp are some of my ALL TIME favorites. But typically, these meals are loaded with sugars. So I have stayed away from them except on special treat days. However, early last week, I was browsing a non-Paleo food blog (The Pioneer Woman) when I stumbled over an excellent-looking take on orange chicken.

But since it's more than a month before my birthday, I decided I would attempt to Paleo-ify her recipe (thus the leap of faith). And this is what I came up with:

Orange Chicken

Stuff You Need:
  • 1 - 1.5 lbs chicken tenders, cut into bite-sized pieces
  • 4 egg whites
  • 2 Tbs tapioca powder
  • ½ cup orange juice
  • 1 Tbs coconut aminos (or soy sauce, if you are not strict Paleo)
  • 1 Tbs honey
  • 1 Tbs vinegar
  • ¼ tsp grape seed oil
  • ¼ tsp sea salt
  • ½ tsp crushed red pepper (or more to taste)
  • 1 clove garlic, minced
  • 1 tsp ground ginger
  • 1 tsp tapioca powder
  • zest of 1 orange
  • ¼ cup water
  • 2 whole green onions, chopped
What To Do:
  1. For the chicken: In a large bowl, whisk together the tapioca powder and egg whites with a fork until almost frothy, about 1 minute.
  2. Add the chicken to the mixture and allow to sit for 5 to 10 minutes.
  3. For the sauce: Put the orange juice, coconut aminos, honey, vinegar, grape seed oil, salt, crushed red pepper, garlic, ginger, and orange zest in a small nonstick skillet and whisk together.
  4. Heat 3-4 minutes until it starts to bubble and thicken.
  5. Whisk together the tapioca powder and 1/4 cup water in a small bowl or cup until well combined.
  6. Add 1 or 2 Tbs of the tapioca powder slurry to the sauce and mix well.
  7. Continue to stir while sauce thickens (for about 1 minute). NOTE: If sauce gets too thick, just add in another 1/4 cup water and whisk in. If sauce is too thin, add another Tbs of the tapioca powder slurry until it reaches a nice syrupy consistency.
  8. Heat about 2 inches of coconut oil in a heavy-bottomed pot until a deep-fry thermometer inserted in the oil registers 350 degrees F.
  9. In small batches, carefully drop a few pieces of chicken into the oil, stirring often for 2-3 minutes or until light golden.
  10. Remove from the oil and let the chicken drain on a plate lined with paper towels for 2 to 3 minutes.
  11. Once all of the chicken has been browned, drop them back into the oil for 1 more minute to really solidify the coating.
  12. Remove from the oil again and return to the paper towel lined plate to drain.
  13. Finally, toss the chicken in the sauce and serve immediately with orange zest and sliced green onions for garnish.


This is basically the recipe for Orange Chicken featured on the Pioneer Woman's site, with just a few substitutions. I traded tapioca powder for corn starch, honey for her brown sugar, grape seed oil for sesame oil, and coconut oil for peanut oil.

The results were AWESOME! We just LOVED this dish and you can bet it's one I'll be repeating in the very near future (I have a surplus of orange juice. That's my excuse and I'm sticking to it!

Tuesday, May 6, 2014

Fabulous (Taro) Fries

I know it's been a while ... I'm still experimenting in the kitchen and have a bit more tweaking to do before I get to share some new favorites with you.

But in the meantime, I wanted to let you in on a little secret ....

Taro root fries are seriously addictive!

These have become a family fave to the Nth degree and are Wonder Boy's favorite fry ever. He even prefers these fries to those you would get at your favorite (ahem) fast food establishment. That's not to say that he's a fan of all Paleo-ish foods I put down before him, but this is a MAJOR SCORE in my book and I'm going to enjoy it!


As a bonus, taro root is seriously inexpensive (a $3 USD jumbo taro root will last our family about a 3 weeks, even with me preparing it at least twice a week) and these little shoestring fries are super simple to make! I have baked them and fried them and either way works well. For seasoning, my crew prefers just a bit of sea salt, garlic powder, and black pepper. You can slice them super thin and make chips or you can make thick slices like home fries. It really IS up to you this time!

This is the way I most commonly prepare and serve our favorite tuber:

Baked Taro Fries

Stuff You Need:
  • 1/4 of a taro root, peeled, sliced thin, and cut into strips
  • 3 - 4 Tbs grape seed oil
  • 1/2 tsp sea salt
  • 1/2 tsp garlic powder
  • 1/2 tsp black powder
  • 1/4 tsp kosher salt
What To Do:
  1. Preheat oven to 350F.
  2. Place your taro fries on a parchment lined baking sheet.
  3. Drizzle the grape seed oil over the fries and use your hands to make sure all fries are coated.
  4. Once all of the fries are coated in the oil, spread them out in a single layer on your pan.
  5. Next sprinkle the dry seasonings on the fries.
  6. Bake for about 20 minutes (depending on the thickness of your fries) until they are a light golden brown color.
  7. Cool them slightly and serve!

If you are in a rush for time, frying them in your grape seed oil is a quick option. On weeknights when we are often rushed, I will go this route. Either way, the taro comes out crunchy and full of flavor! ENJOY!

Wednesday, April 16, 2014

Slacking and Snacking

I haven't truly been slacking with this blog, it just SEEMS that way because I haven't posted anything new as of late.

But the truth is that I have been pretty busy in the kitchen. I'm trying out new recipes and trying to dial in some changes before I share them with you here. I am [--- this close ---] to having things ready to share on at least 2 or 3 different recipes. But we've got to eat the results from my previous experiments before we can try again and make sure before I commit to posting them here.

In the mean time, I'd like to talk about snacks.

And I'll admit that this has been one of the tougher transitions to our Paleo-ish lifestyle. When you think about snacks, you want something quick, easy, and satisfying. And when you are avoiding sugary, pre-packaged foods, this can be a bit of a challenge. But we have found a few things that help to satisfy when we get a case of the munchies.

Nuts:
Our first go-to snack has been (& will likely continue to be) nuts. They're easy to take along with you, can be spiced for add flair, and are just an EASY way to add a few bonus calories to your day. Nuts are packed with protein and when seasoned just right can take the edge off of even a serious junk food craving.

Fruit:
After nuts, you'll often find us reaching for fresh fruit, nature's candy. In fact, we all enjoy at least one fruit snack per day. Personally, I prefer to mix a few fruits together in something resembling the fruit cocktail cups my mom packed in my lunch as a 3rd grader. I like to mix tart fruits (like black berries and raspberries) with something sweet (like strawberries, pineapple and/or peaches). The only drawback to this is that you have to keep a fair bit of fruit on hand (which means you have to take care to eat it all before it goes bad) and it takes a bit of prep time to put it all together. It's not a lot of time, but it's definitely more than grabbing a handful of almonds or tearing straight into an apple on its own.

Tuna:
Another snack I truly enjoy, but that again requires some prep time, are tuna wraps/boats. My mom makes the most amazing tuna salad I've ever enjoyed and this version comes pretty close to her original. The trick (for me) is to always make sure I sprinkle the top with a bit of smoky paprika. That added kick always makes this dish just sing, if you ask me. I will wrap up my tuna in a lettuce leaf, plop it on top of pickle slices (see below), or even use it as a dip for apple slices. If I have a Paleo bread on hand, I'll even enjoy it my favorite way - as a toasted sandwich. Once you get past the initial preparation time, this is a snack that will come together quickly when you need a quick bite and as a bonus, if you make a good bit of it at once (I like to use the "family size" cans of tuna) then you can keep it on hand for a few days at a time (unless you go nuts and eat it all at once - which I wouldn't advise, no matter how tasty you make it).

Chips:
At this point, I'm starting to reach when it comes to quality snacks. But we try to keep at least a bag or two of Paleo-friendly chips in the pantry. Our favorites are plantain chips, lightly salted. We will sometimes keep sweet potato chips on hand (I like to crush them and add them to several recipes as well). And then from time to time, we enjoy an "exotic mix" of taro, parsnip, sweet potato, and batata chips from our local grocery store. We can (& do) make most of these chips from scratch on our own from time to time, but when you just want a quick bite of something to keep you from cheating, going through the process of making your own rarely happens (at least in my kitchen). So having something like this on hand really helps. A word of caution though ... this is one of those cases where you REALLY need to read your labels. Most spiced chips (spiced with anything other than sea salt, that is), will likely contain sugar. It really narrows down your chip choices, but we have found at least 2-3 brands of chips in our local store that fit the bill. Just don't skip on reading those labels!

There are many more snacks, of course, but I have found that these are the ones we turn to most often. These require little or no preparation, will satisfy a particular taste (fruit for sweet, tuna for a snappy treat, chips when a salt craving hits, and nuts for a more filling snack), and are regular staples in our kitchen.

Sunday, April 6, 2014

Dark Chocolate Cupcakes

If you have spent any time following this little blog, you know I have a bit of a sweet tooth. And I particularly crave chocolate. For me, it was a true relief to learn that dark chocolate is often featured in Paleo kitchens around the globe.

My chocolate donuts are a family favorite when we need to satisfy our sweet cravings and we often take them to pot luck dinners since they are such a decadent treat, enjoyed by even those who do not embrace Paleo cooking methods. But when faced with dinner with friends who have nut allergies, we needed to find a nut-free alternative to our favorite dessert.

These cupcakes feature coconut flour and arrowroot powder in place of almond meal. This recipe reminds me of devil's food cake in that it is moist and rich with a lovely dark color. Wonder Boy and I both really like dark chocolate and thus these were an instant favorite. Our friends all seemed to enjoy them as well. It is likely that this will be a recipe that we can take to church or school functions where you don't know if there will be anyone present with nut allergies.

Dark Chocolate Cupcakes

Stuff You Need:
  • 3/4 cup cocoa powder, sifted
  • 1/3 cup coconut flour, sifted
  • 1/3 cup arrowroot powder, sifted
  • 1/2 tsp baking soda
  • 1/2 tsp baking powder
  • 1/4 tsp kosher salt
  • 5 eggs
  • 1 cup all-natural applesauce
  • 1/4 cup honey
  • 1 Tbs vanilla
  • 1/2 tsp liquid stevia
  • 1/4 cup coconut oil, melted
What To Do:
  1. Preheat oven to 325F.
  2. Wisk cocoa powder, coconut flour, arrowroot powder, baking soda, baking powder and salt in your mixing bowl.
  3. In a separate bowl, combine the eggs, applesauce, honey, vanilla, and stevia. Mix on high for at least 2 minutes. The longer you mix, the lighter and more airy the cupcakes will be.
  4. With the mixer still running on low, drizzle in the melted coconut oil until well combined.
  5. Add the dry ingredients, 1/4 cup at a time until well incorporated.
  6. Fill your cupcake pan with paper liners and fill 2/3 full with batter. This should make between 18 - 24 cupcakes, depending on how long you whipped up the batter.
  7. Bake for 35 minutes, or until a toothpick inserted comes out clean.
  8. Remove the cupcakes from the pan and cool on a wire rack for at least 30 minutes before icing.


I suggest this fantastic whipped cream frosting recipe from Elena's Pantry for the icing! And if you are like me and prefer chocolate icing with your chocolate cupcakes, then I suggest you add 1 Tbs of cocoa powder to turn Elena's Whipped Cream Icing into a truly sinful tasting chocolate cream icing.

Monday, March 31, 2014

Cocoa-Crusted Slow Cooker Pot Roast

Wonder Boy has a ... how do you say it? ... let's be polite call it a "selective palate," which means I am constantly on the lookout for foods that the whole family can enjoy (so I don't end up making multiple dishes for each meal). And when I find one that works, well, I tend to shout it to the roof tops.

This is one of those rare gems that truly earns the label of family favorite! The fact that it's a crock pot meal to boot is just a bonus!

Cocoa-Crusted Slow Cooker Pot Roast

Stuff You Need:
  • 3 lb chuck roast
  • 2 Tbs cocoa powder
  • 1 Tbs sea salt
  • 1 tsp black pepper
  • 1 tsp garlic powder
  • ½ tsp habanero chili powder
  • ½ dried oregano
  • 1 Tbs grapeseed oil (or olive oil)
  • 1 cup beef broth
  • 1 large onion, quartered
What To Do:
  1. Combine the dry seasonings in a small bowl.
  2. Rub the spice mixture over your roast and refrigerate for 30 minutes (over night is great, if you think about it before hand).
  3. Heat the oil in a heavy bottomed pan (I use a cast iron skillet) over medium hat.
  4. Once the oil is hot (when it starts to shimmer, but before it begins to smoke) add your onions to the pan and let them cook until slightly browned.
  5. Separate the onions and line the bottom of your slow cooker with them.
  6. Add the broth and set aside.
  7. Brown your roast on each side, until you have a nice crust, 2-3 minutes per side.
  8. Transfer the roast to your slow cooker, place on top of the onions, and cook on low for 8 hours.


This comes out of the crock pot ready to fall right apart for you! It's juicy and tender and full of flavor.

We like to serve it with a side of tarrow root fries, snappy apple slaw, or just a fresh green salad.

I hope you will enjoy it as much as we have!

Friday, March 28, 2014

Sour Sippers

In our efforts to put only "clean things" into our bodies, we recently gave up most (if not all) of our artificially sweetened drinks. I was enjoying at least one flavored water per day. But it was sweetened with apertame or some other chemical. So it had to go. That left us with water as our primary sipper throughout the day.

And that's fine. We've been drinking primarily water for a good long while.

But every now and then (about 1 meal per day), I really like to have some kind of sweet and/or snappy treat. so I started sampling lemonade recipes. It took a while, and a bit of tinkering, before I found the right sour sipper for me.


Sour Sippers

Stuff You Need:
  • 10 - 14 lemons (enough for 1 cup of lemon juice)
  • 4 - 6 limes (enough for ½ cup lime juice)
  • ½ cup agave nectar
  • 6 cups water
What To Do:
  1. Warm the water on the stove over medium heat. It doesn't need to boil or even simmer, we just want it hot enough to help the agave dissolve.
  2. Add the agave nectar and stir until dissolved.
  3. Add lemon & lime juices, stir until well mixed.
  4. Refrigerate until cold and enjoy!

I like to garnish my drinks with frozen fruit instead of ice cubes. Raspberries and blackberries are my favorites, but pineapple chunks and strawberries are also very flavorful.

I find this to be a nice, snappy, and down right refreshing drink. I have gotten into the habit of enjoying a small glass at lunch each day, especially now that the sun is starting to shine on us again. It's a perfect compliment to a fresh tuna salad or lettuce wrap, but honestly, I enjoy this little treat all on its own. I hope you will as well!

Monday, March 17, 2014

Building a Better Burger

OK. So here I sit again, telling you all about a craving I've had that just wouldn't go away. This time, it was the almighty hamburger that has been calling my name. Perhaps it's due to the gazillion burger commercials on TV. I don't know the reason, but I'll admit that a good burger is one of those dishes that I miss. There are few meals as satisfying as a nice, juicy burger - I don't even need the fries with it. A good burger is satisfaction on a plate, in my book.

So ... what's a Paleo kitchen supposed to do with such a craving? I have tried my hand at several Paleo breads, but none have been truly satisfying.

But then inspiration hit! And I decided to "super size" one of my favorite plantain treats to serve as the "bun" of my Paleo burger. And let me just say now for the record ... this has been one of my better ideas! Check it out!


This burger is only a quarter pound patty, but it was so filling and satisfying that I could only eat about half of it (yay for yummy left overs!). And while, in the future, I may downsize to slider-size, this was an AWESOME Sunday night special supper.

Paleo Burger on Tostones:

Stuff You Need:
  • 2 green plantains
  • 1 cup coconut oil
  • sea salt (for sprinkling)
  • ½ lb extra lean ground beef
  • 2 oz. chorizo
  • ½ cup crushed plantain chips (any other "paleo" chips would work as well)
  • ¼ tsp garlic powder
  • ¼ tsp onion powder
  • ¼ tsp red pepper flakes
  • 1 tsp yellow mustard
  • 1 tsp agave ketchup

What To Do:
  1. First, we make the plantain "buns". To do that, peel your plantains and slice them in half crosswise.
  2. In a deep frying pan over medium heat, melt your coconut oil.
  3. Once the oil is hot, add the plantain stalks into the oil standing on one end.
  4. Fry until one side is golden brown, flip, and fry the other side until golden brown as well.
  5. Remove from the heat and place on plate lined with paper towels to drain off any excess oil.
  6. One at a time, place your plantain chunks between sheets of parchment paper and smash with a plate to about a ¼ inch thick.
  7. Add the flattened plantain patties back to the oil and fry until crispy and golden brown. Keep an eye on them as this happens pretty quick.
  8. Remove from the oil and place on towel-lined plate to drain.
  9. Sprinkle them with sea salt and set aside while you prepare your burger.
  10. Mix all remaining ingredients in a bowl, divide in half, and shape into quarter pound patties.
  11. Brown both sides in a well-oiled pan. Cook until no pink remains.
  12. Place your burger on one of your plantain patties, add burger fixings (like lettuce, tomato, pickles, and onions), and top with a second plantain patty.
And that's it folks!

Please note ... this is a very calorie dense meal. Usually, when I prepare tostones, I will get at least 3 servings out of a single plantain. Sometimes, I can even get 4 servings. In this recipe, you get only 2 per plantain. So unless your have very small plantains, this will double the number of calories consumed.

With that in mind, we don't serve these with any side dishes.

Regardless, this was truly satisfying and my burger craving is no longer tickling my tongue to be naughty!

Wednesday, March 12, 2014

Snappy Apple Slaw

This little side dish is a true go-to recipe for me. When faced with a pot luck dinner, a special family gathering, or just a weeknight meal in need of a little pizazz, this is one of the first dishes I consider.

It's taken a while to get the proportions down just right, as this is an adapted recipe from our pre-Paleo days. And the original had a very healthy (ahem) serving of sugar in it. We decided to try shredded apple in the dressing to sweeten things up, added a touch of honey, changed the type of vinegar, and BINGO - we had the sweet and snappy treat we were craving.

To speed things up, I use a pre-packaged bag of slaw. But shredding the fresh stuff is a great option when you have the time!

Snappy Apple Slaw

Stuff You Need:
  • 1 - 16 oz. bag pre-packaged slaw mix
  • 3 Tbs sesame seeds, toasted
  • ½ cup slivered almonds
  • ¼ cup honey
  • ¼ cup apple cider vinegar
  • ¼ cup grape seed oil (lite olive oil will work as well)
  • ¼ tsp sea salt
  • ¼ tsp ground mustard
  • ½ tsp garlic powder
  • ½ tsp black pepper
  • 1 large apple, peeled and shredded
What To Do:
  1. Combine slaw, toasted sesame seeds, and slivered almonds and set aside.
  2. Warm honey in the microwave for 30 seconds.
  3. Combine honey and the remainder of ingredients in a medium bowl to make the dressing.
  4. Just prior to serving, pour the dressing over the slaw and toss well.


This recipe comes together pretty quickly. In fact, shredding the apple is probably the longest single step. When I make this for a pot luck or some other dinner where we are bringing a dish, I will carry the dressing in a separate bowl, which I warm for 10 - 15 seconds in the microwave (to make the honey pour more smoothly) just before mixing and serving.

We like to change up this recipe from time to time and add mandarin orange slices or switch out the slivered almonds for pecans. I think blueberries would also be fun to try and maybe switch out walnuts for the almonds. The possibilities are limitless!

I hope you will enjoy this snappy side dish as much as we do!

Monday, March 3, 2014

Bacon-Wrapped Yams

I do most of my involved cooking on the weekends. There just isn't enough time on a typical weeknight to spend more than a few minutes getting dinner on the table. So typically, I try out new recipes on the weekends and I will often cook up a number of main dish entrees so I'll have something I can put on the table quickly before judo or soccer practice. However, this often leaves me looking for a suitable side dish on any given week night.

When that happens, THIS is one of my favorites to pull out of the cupboard!


These DO take about 45 minutes all together before they can make it to the dinner table, but they are SO worth the effort. And if all I am doing is heating up the main entree, it's not such a hassle to put a bit of extra effort into this side dish.

Bacon-Wrapped Yams

Stuff You Need:
  • 1-2 medium sized yams/sweet potatoes
  • 3-5 strips of bacon
What To Do:
  1. Preheat the oven to 425F.
  2. Peel and cut your yams into ½-inch thick french fries.
  3. Cut your bacon into thirds, crosswise. And then cut again in half, lengthwise. You should get 6 bacon strips out of each piece of bacon.
  4. Wrap each strip of bacon around one of your yam fries.
  5. Place your bacon-wrapped yam fries on a wire rack over a foil-lined baking sheet.
  6. Bake for about 30 minutes at 425F or until your yams are golden brown and your bacon is starting to crisp. There is no need to turn your fries mid-way if you use the wire rack since air can circulate all around them.
  7. Remove from the oven and place on a plate lined with paper towels to drain off any remaining grease.
And that, folks, is all she wrote! I have a handy, dandy potato slicer which helps to make quick work of the yams. If you have one, a vegetable spiral slicer would also work really well to speed up the prep work on this dish. Even a mandolin slicer can help if you are in a rush.

But regardless of how you slice them up, this side dish comes together pretty quickly. It carries a wallup of flavor and is sure to please even the pickiest of eaters.

Tuesday, February 25, 2014

Paleo Pockets (Empanadas)

I have not been feeling my best the last few weeks. And one side effect of my condition is that I am craving high flavor food more than ever. That is due partly to the fact that I haven't been able to taste food that isn't super savory and, of course, when I feel less than my best, I start looking for more of my favorite comfort foods.

But I have to remember, that on these days when I am feeling under the weather, I need good quality foods more than ever.

Enter these little beauties! They are based on the Fabulous Flat Bread recipe I shared a while back and a tried-and-true family recipe for the filling. These little treats are sure to satisfy whether you are craving comfort foods or just want a Tex-Mex taste to top off your day.


Paleo Pockets (a.k.a. Empanadas)

Stuff You Need:
  • ½ cup almond flour
  • ½ cup tapioca flour
  • ½ cup milk + 1 Tbs milk
  • salt (pinch)
  • 1 lb ground beef
  • ½ yellow onion, finely chopped
  • yellow or orange bell pepper, finely chopped
  • 1 jalapeno, seeded, finely chopped
  • ½ cup raisins
  • ¼ cup slivered almonds
  • 1 tsp cumin
  • 1 tsp chilli powder
  • 1 tsp garlic powder
  • ½ tsp black pepper
  • ½ tsp sea salt
  • 2 Tbs butter or ghee, melted
What To Do:
  1. Preheat your oven to 350F.
  2. First we'll prepare our crust/tortillas... put the almond flour, tapioca flour, and salt in a bowl and combine, breaking up any clumps - I use a wire whisk for this, but a fork will work just as well.
  3. Stir in the milk until it reaches the consistency of pancake batter, add more or use less as needed - different brands of almond flour may require a bit more or less depending on how finely it has been milled. You should end up with enough batter for 4 good sized tortillas.
  4. Next, heat a nonstick pan over medium heat and pour ¼ of your batter into the pan. Swirl the pan around to thin out your tortilla to your desired size/thickness.
  5. As soon as you are able, flip over your tortilla and brown the other side. You want your tortilla slightly under-cooked. We'll finish it off in the oven.
  6. After all 4 tortillas are browned on both sides, set them aside until ready to fill.
  7. Now to prepare the filling ... start by browning your ground beef until no pink remains.
  8. Next, drain the beef to remove as much fat as possible and then return the mixture to the skillet.
  9. Next you need to add the onions, bell pepper, and jalapeno to the pan. Saute with the beef until the onions are translucent.
  10. Next, add the raisins and dry spices. Let the mixture cook for a couple of minutes, stirring often, to release the flavor of the spices.
  11. Now we're ready to assemble our empanadas... place a tortilla on a parchment lined baking pan and fold in half.
  12. Lift the tortilla and spoon about 2 - 3 Tbs of the meat mixture inside the fold. Use a fork to crimp the edges shut. Note: since the tortillas are under cooked, this is not difficult and should not require any binder to hold them together. If you run into trouble, you can brush a bit of the melted butter/ghee along the edges to help them stick together while crimping with the fork.
  13. Repeat with the remaining tortillas.
  14. Now you need to brush the tops of your empanadas with the melted butter/ghee.
  15. Bake at 350F for 10-15 minutes, until tortillas finish cooking. They will have a nice golden color once they are done.
  16. Serve with salsa and ENJOY!

You will note that you will have a LOT of left over meat mixture. This makes for FABULOUS left overs. You can always make more empanadas (& I highly recommend that you do so), but this filling is also great along side fried eggs for breakfast, wrapped up in butter lettuce, or topping a killer taco salad! You really can't go wrong with it! This also freezes well so you can always have some when you need a quick week-night meal.

You can fill your empanadas with just about any filling that suits your fancy. The first night we tried these, I filled them with my Crock Pot Carnitas. If you are not strict Paleo, these would be AWESOME stuffed with melted cheese and onions. MMMMMMM I start drool just thinking about it. And there are sweet fillings as well - think apple pie kind of fillings. I haven't tried this yet, but you can bet I'll be back to update the site once I do!

I hope you will enjoy these as much as we have. They have become an instant favorite and they are so flexible and offer so many different options, depending on how you are feeling on any given day. It doesn't get much better than that.

Wednesday, February 19, 2014

Tasty Tenders

In looking back over my most recent posts, it would seem that I spend a lot of my time trying to find "Paleo-ified" versions of the foods we've had to cut out of our diet.

In reality, we don't actually spend a lot of our time on these efforts, but with the onset of cold weather and an upper respiratory infection that I just can't seem to shake, I'll admit to craving more comfort foods than usual.

However, the goal in my cooking, both before and after the switch to a Paleo-ish diet, has been bold flavors. I have found that the key to keeping my eating in check is having truly flavorful foods on my plate. You might find that counter intuitive - surely if the food tastes awesome, it'll just entice you to eat more, right? I have found the opposite to be true. When the food bursts with flavor, I eat my portion and feel satisfied. But when the dish is lacking in flavor, I find myself searching the kitchen for something more to fill that void.

The recipe I am sharing today is one that truly satisfies. It's taken quite a few attempts to get this one right, but now it is a dish that the whole family enjoys!

These chicken tenders were inspired by Arsy over at Rubies and Radishes. She has so many inspiring recipes, I highly recommend that you click over and check them out for yourself! This recipe for Paleo Chicken Tenders was the first one I tried from her site but it has not been the last!

Tasty Tenders

Stuff You Need:
  • ¾ cup plantain chips, ground
  • ¾ cup tapioca flour
  • ½ teaspoon cayenne
  • ½ teaspoon dried oregano
  • 1 teaspoon onion powder
  • 1 teaspoon garlic powder
  • ½ teaspoon ground black pepper
  • ½ teaspoon sea salt
  • 2 eggs, lightly beaten
  • coconut oil for frying
  • 1 lb. organic chicken tenders
What To Do:
  1. Preheat the oven to 350F.
  2. Grind your plantain chips in a food processor until you reach the consistency of a course ground flour. You can keep grinding until it has a finer texture, but I personally like a more course grind.
  3. In a shallow bowl or pie pan, combine chips, tapioca flour and spices.
  4. In another shallow bowl, beat the eggs together.
  5. Dredge the chicken tenders one piece at a time in the flour & spice mixture. Shake off the excess flour, then dip the chicken tenders in the egg and then once again dredge them in the flour.
  6. Melt your coconut oil in a heavy skillet over medium heat and add the chicken strips. Don't crowd the skillet, it is OK to cook these in batches.
  7. Cook your tenders for 2-3 minutes on each side. This will give a nice crisp to the flour coating.
  8. Transfer the tenders from the skillet to a foil-lined roasting pan.
  9. Bake at 350F for 10-15 minutes, until no pink remains in the tenders.
  10. Remove from the oven and place on a plate lined with paper towels to drain off any remaining oil.

This recipe is pretty darn close to the original I found over at Rubies & Radishes. The big difference is that I don't finish cooking these in the coconut oil in the skillet. I tried multiple times to get them just right, but inevitably found that either the coating scorched (my heat was too high) or they tasted too oily (when I lowered the heat). So my compromise was to just kind of brown them in the oil in the skillet and then finish them off in the oven. This process only added a few minutes to the total prep time and the end result was well worth it! The strips were crispy and light tasting.

The spice mixture has a nice bold flavor, but don't be afraid of the cayenne. Wonder Boy is not a fan of spicy foods and he has given this his stamp of approval as-is.

I hope you and your family will enjoy them as much as we have!

Monday, February 17, 2014

Bacon-Wrapped Sausage-Stuffed Dates

I've been promising to get this gem of a recipe shared here for about 2 weeks now. And my intention was to get it up here ASAP so that everyone within earshot blog-shot could enjoy it in all of it's savory, sweet goodness. But life sometimes gets in the way. And sometimes you come down with the flu. UG.

But I digress ... you are here for something special, so feast your eyes on THIS ...


I know, right?!

And to be honest, this picture just does not do it justice. In fact, I can see I am just going to have to make these again soon so that I can try to get a better shot for you.

I stumbled on this magnificent idea while browsing the amazing recipes over at Paleoaholic. Like so many of my favorites, these come together quickly and with very little fuss and they deliver such a powerful punch of flavor that they were an instant favorite of everyone that has tried them (& we've been sharing these at every opportunity).

Bacon-Wrapped Sausage-Stuffed Dates

Stuff You Need:
  • 15 Medjool pitted dates
  • sausage (I used a local spicy jalapeno sausage)
  • 5 slices bacon, cut into thirds crosswise
  • 15 toothpicks
What To Do:
  1. Preheat the over to 400F.
  2. Slice sausage lengthwise. Then slice off 15 - ¼ inch semi-circles of sausage.
  3. Slice your dates in half and place a semi-circle of sausage in each.
  4. Wrap each stuffed date with bacon and secure with a toothpick.
  5. Bake for 30-40 minutes, until the bacon is nice and crispy. Flip them at about the 15 minute mark so that both sides will be equally crispy.
And that, folks, is all she wrote! You'll want the dates to cool at least a little before enjoying, but it's hard to wait because these will simply call to you from the oven. Your tongue will thank you for a little restraint though.

As usual, I've made a few adjustments to the original recipe. First off, the original calls for Spanish chorizo. I didn't have any the day I first planned to make these and then I loved them so much with the spicy jalapeno sausage that I just stuck with it. And second, the original recipe calls for the addition of a spicy tomato sauce. As you can tell from my picture, I did serve it that way at least once. But in all honesty, I didn't feel like it truly added anything to the dish, so I only served it that way the first time and we haven't missed it one bit.

I served these as a special treat on Super Bowl Sunday. We've shared them with friends at a pot luck dinner. And we've whipped them up just to kick up a weeknight meal. They are a wonderful treat that can turn any day into a special event.

And I hope you will enjoy them as much as we have!

Monday, February 3, 2014

Grain Free Tortillas

I know my last post was about flat bread, but the very next day after posting it, I stumbled across THIS recipe for a "true tortilla" over at the Health Starts in the Kitchen blog.

I literally went home and tried the recipe that very night! But alas, I did not have a critical piece of equipment - the tortilla press.

I tried to just roll it out with a pin, but it made the BIGGEST mess. However messy, the results were still very promising. So Wonder Dad and I went out on a hard target search for a tortilla press at our first opportunity and did not come away disappointed.

On Super Bowl Sunday, I decided to christen the new press with a fresh attempt at Hayley's tortillas, with a couple of modifications.

Hayley's Grain-Free Tortillas

Stuff You Need:
  • ½ cup blanched almond flour
  • ½ cup arrowroot powder (+ extra to dust your tortilla press)
  • ¼ tsp sea salt
  • 4 - 6 Tbs water
What To Do:
  1. Combine dry ingredients in a medium sized bowl and mix well.
  2. Add water 1 Tbs at a time just until your dough will hold together. NOTE: Hayley's recipe called for 3 - 4 Tbs of water. I don't know if it is due to the humidity in the air (or lack thereof), the brand of almond flour/arrowroot powder I have been using, or what, but even 4 Tbs was not enough to get my dough to hold together. I ended up using 6 Tbs each time I tried this recipe. So my advise is to do just as suggested, start with just a single Tbs and work your way up until the dough holds together.
  3. Using additional arrowroot powder as needed, divide your dough into 4 equal parts and roll into balls.
  4. Line your tortilla press with plastic shopping bags (see, they're good for SOMETHING) and lightly dust with arrowroot powder.
  5. Press down your ball of dough, peel off the press and place in a cast iron skillet that has been preheated over medium heat.
  6. Cook on each side until it starts to get light brown spots (about 1 - 2 minutes per side).
  7. Top with your favorite toppings and EAT UP!

Please note that, along with changing the amount of water used, I also changed the amount of salt. In fact, I cut it in half from what Hayley had suggested. This is a personal preference. I think it works very well without the added salt, but if you want a bit more zest in your tortilla, then feel free to add a bit more.

Like the flat bread recipe, this one is super simple and features only a handful of ingredients. They come together pretty quickly and the results are super tasty! I hope you will enjoy them as much as I have!

Monday, January 27, 2014

Fabulous Flat Bread

One of the hardest adjustments I have had in switching to a primarily grain-free diet has been the loss of bread at my meals. And of the breads I have had to abandon, tortillas were probably the hardest. Sure, I love a good yeast roll as much as the next gal, but to be honest, I rarely had those in the house. However, tortillas were featured in about 3 of every 5 meals I made. So you can understand why the loss has frustrated me.

I've tried my hand at a number of Paleo breads and such. And while I've found a few that I like, in general they still pale in comparison to the "real thing."

That is, until I stumbled on this recipe from Ashley over at My Heart Beets.


Ashley's recipe is as easy as it is yummy! Which means adding it to a meal only takes a few extra minutes and the result is SO worth it. Be sure to click on over and check out her original recipe as I make a couple of changes that suit our family a bit better.

Fabulous Flat Bread

Stuff You Need:
  • almond flour (in equal proportion to the tapioca flour)
  • tapioca flour (in equal proportion to the almond flour)
  • milk
  • salt (optional)
What To Do:
  1. Put almond flour and tapioca flour in a bowl and combine - I use a wire whisk for this.
  2. Stir in milk until it reaches the consistency of pancake batter.
  3. Heat a nonstick pan over medium heat and pour batter to desired thickness.
  4. Once the batter fluffs up and looks firm/mostly cooked, flip it over to cook the other side.
OK. So unlike Ashley's recipe and my usual post, you'll notice there are no quantities listed.

First off, Ashley's recipe makes only 2 servings and as a family of 3, I typically need a bit more than that. Secondly, I tend to prepare this as a substitute for tortillas. And as such, I tend to thin out my batter just a bit more than originally suggested. And lastly, Ashley's recipe features full fat coconut milk. And as I have admitted before, I just don't care for coconut milk (or almond milk for that matter). We have kept regular dairy milk in our diet, so that is why you see it here. You should note that coconut milk tends to be thicker, so you will end up needing more of it than dairy milk - check out Ashley's version for the proportions she uses. SO ... that's a drawn out way to say, in this case, I like doing this by sight rather than exact measure.

I tend to use ¾ cup each of almond flour and tapioca flour. To that I will add about ½ cup of milk. It may take a little more or a little less, so I will usually start with ¼ cup of milk, mix that up with the dry ingredients, and then add more as needed until my batter is slightly thinner than pancake batter. Thinning out the batter makes it easier to prepare a nice, thin tortilla-like flat bread.

Next we need to talk about the salt. You'll note that it is marked optional. When I prepare this flat bread as a tortilla substitute, the salt is absolutely necessary! And in that case, I will add about ¼ tsp to the flour mixture before pouring the milk. If I am making this to serve with jam and nut butter (a FANTASTIC way to enjoy this bread, btw) then I like to leave it out. Without the salt, you get to enjoy a nice sweet taste that pairs very well with nut butter and/or jam.

This flat bread is quick and easy. It fills a void that has been sorely missed in my meals. And it tastes OUT OF THIS WORLD!

I hope you will enjoy it as much as I have!

Wednesday, January 22, 2014

Elena's Primal Chocolate Chip Cookies

Because sometimes you just need a chocolate chip cookie.

I needed one on Monday night. I was feeling ... under the weather ... and I wanted a sweet treat to end the day on a better note.

This is my go-to cookie recipe, it comes from Elena's Pantry and even Wonder Boy swears it's his favorite cookie ever. We served it at Christmas (to family we knew did not have nut allergies) and they all raved about it. This is the kind of recipe that you never feel like you're missing out on the "real deal."

As usual, I highly recommend checking out the original recipe over at Elena's site. I am only posting it here so that if I ever lose that bookmark, I will still be able to find it here.

Elena's Chocolate Chip Cookies

Stuff You Need:
  • 2 cups blanched almond flour
  • ¼ teaspoon celtic sea salt
  • ½ teaspoon baking soda
  • ¼ cup butter, softened (you can substitute vegan shortening or coconut oil)
  • 2 tablespoons honey
  • 1 tablespoon vanilla extract
  • ½ cup chocolate chunks
What To Do:
  1. Put almond flour, salt and baking soda in a food processor & pulse to combine.
  2. Pulse in shortening, honey and vanilla until dough forms.
  3. Remove blade from the processor and stir in chocolate chunks by hand.
  4. Scoop dough one level tablespoon at a time onto a parchment lined baking sheet.
  5. Press balls of dough down gently and bake at 350° F for 6 - 8 minutes or until they are a nice golden brown color.
  6. Now this is the hard part ... let the cookies cool for 15 minutes. They taste better after they have set up a bit and they crumble if you try to pick them up too soon. But they are worth the wait, so hang in there!

Tuesday, January 14, 2014

Chocolate Dipped Cherry Pie Bites

O.M.G.! These are just WAY TOO AWESOME to not share with any- and everyone within earshot (blog-shot?).

This is not my recipe, I'm only copying it here so that I don't loose my book mark to it some day. I added only one step (the chocolate part, big surprise, right?), but I strongly suggest that you jump over to Our Paleo Life to check out this and all the other inspiring recipes right from the source!

OK ... so on to the good stuff!

Chocolate Dipped Cherry Pie Bites

Stuff You Need:
  • 10 Medjool Dates, pitted
  • 1 cup almonds
  • 1 cup dried cherries
  • up to 1 Tbs water
  • ½ cup dark chocolate chips
What To Do:
  1. Combine all ingredients (except water & chocolate), in the order listed, in the bowl of a food processor.
  2. Process until mixture resembles coarse gravel.
  3. While the processor is running, add a thin stream of water, about 1 Tbsp, maybe less depending on the moistness of your dates.
  4. Stop the processor and check the mixture inside. If it sticks together when you smush it, then you’ve got the right consistency. If it’s still crumbly, add more water. You don’t want to add too much water because the bites will be too sticky.
  5. When you’ve got the right consistency, roll mixture into tablespoon-size balls, and place on sheet of parchment paper.
  6. Melt your chocolate chips. You can use a double boiler, but since this really isn't a lot of chocolate, I tend to use the microwave on low, 20 seconds at a time until all is melted.
  7. Dip the cherry pie bites one at a time in your chocolate and place back on the parchment paper.
  8. Once the chocolate is set (it only takes a few minutes) you can store these in an airtight container in the refrigerator for about a week (if they last that long)

I'll be honest, when we made these last night, we didn't wait for the chocolate to set. As soon as they came out of the chocolate, we were popping them in our mouths! And we were not disappointed. This is a really nice sweet treat.

In the future, we may try using roasted pecans instead of the almonds. I'll bet this would work VERY WELL with dried blue berries as well. And maybe, just maybe, a dash of sea salt on top of the chocolate to further enhance this decadent treat. Oh the possibilities!

Wednesday, January 8, 2014

Oh So Easy Spaghetti Squash & Meatballs

Pasta is another one of those foods that I always associate with comfort eating. And I have to admit that I was worried this would be one comfort food I would just have to learn to live without.

Enter the humble spaghetti squash. I was dubious when I picked it up for the first time. I'm not a fan of most squash dishes, but I was craving some meatballs in marinara sauce with noodles and this seemed like the best place to start to feed that fix.

I found this recipe over on the Paleo Pot blog that looked both appetizing and easy. So I went straight to the produce department and grabbed up a spaghetti squash for my first experiment.

I am not going to re-post the recipe here because I didn't change anything the first go around. It's easy and yummy and I highly recommend it. So click on the link and check it out for yourself.

With that said, I'm going to post the slightly different approach here that I have adopted. Ya see, as easy as the original recipe, I found a way to make it both easier and more complicated. Let me explain...

My local grocery store carries a jarred marinara sauce sweetened with honey and without any "forbidden" ingredients. So I stopped making the marinara from the original recipe. And then, to change things up some more, I started making my meatballs separately. First off, I was only able to fit about 6 meatballs in the crock pot with my squash, so I always ended up making more anyway. And then my better half bought me an awesome meatball pan that I just fell in love with and makes meatball preparation a breeze! And then to veer a bit further from the starting recipe, I found the Italian sausage a bit salty so I went back to beef for my meatballs.

In the end, I guess about the only part of the original recipe that I have kept is that I steam the spaghetti squash in the crock pot with the marinara. It works great and is very little fuss on my part to prepare the squash.

Anyway ... without further ado, this is my version of things ...

Oh So Easy Spaghetti Sauce & Meatballs

Stuff You Need:
  • 1 medium spaghetti squash
  • 2 jars HEB Texas Marinara
  • 1 lb extra lean ground beef
  • 8 oz chorizo, casing removed
  • 1 cup minced onion
  • ½ cup diced bell pepper
  • 2 cloves minced garlic
  • ½ tsp oregano
  • ½ tsp chile powder
  • 1 Tbs roasted bell pepper & chipotle spread (you can substitute adobo sauce here)
  • 2 Tbs yellow mustard
  • 2 Tbs agave ketchup
  • black pepper and salt to taste
What To Do:
  1. Dump both jars of marinara in a 6-8 quart crock pot.
  2. Cut the squash in half (crosswise), scoop out seeds, and place cut side down in the marinara.
  3. Cook on low for 5 hours.
  4. About an hour before the squash is done preheat your oven to 350F degrees. If you prefer you can prepare these a day ahead and just reheat when ready to use them.
  5. In a large bowl, mix the remaining ingredients. It's messy, but using your hands is the best way to get everything distributed just the right way.
  6. Roll into meatballs and bake for 30-45 minutes (depending on how thick you want your meatballs).
  7. Remove the squash from the crock pot and use a large fork to pull the spaghetti out. It will resemble the size and texture of angel hair noodles.
  8. Ladle the marinara on top of the squash, top with meatballs, and DIG IN!

This recipe makes quite a lot of "noodles." I typically get 6-8 servings of spaghetti out of one medium squash. And thankfully it holds up really well if you reheat it in the microwave which makes this a favorite for week day lunches.

On top of the ease of this recipe, it turns out that spaghetti squash is quite tasty! It has a slight sweet flavor to it, but nothing strong enough to compete with the tang of the marinara. So in the end, we ended up with a great, easy recipe that we all can enjoy and I can return another comfort food to my list of go-to dishes.

Tuesday, January 7, 2014

Paleo-strone (hearty winter soup)

When the weather turns cold, it just feels natural to me to find comfort in a big steaming bowl of soup (or chilli or BOTH). And one of my all time favorite comfort soups is minestrone. However, minestrone is loaded with pasta and other things not currently on the menu. So I had to improvise. The following is what I came up with and it has become my current favorite cold weather meal!

Paleo-strone (vegetable beef soup)

Stuff You Need:
  • 1 Tbs olive oil
  • 1 sweet potato, julienned
  • 1 cup carrots, julienned
  • 1 zucchini squash, julienned
  • 1 yellow bell pepper, chopped
  • 1 red bell pepper, chopped
  • 2 shallots, minced
  • 2 cloves garlic, minced
  • 1 lb ground beef
  • ½ lb Italian sausage
  • 28 oz can diced tomatoes with juice
  • 14 oz beef broth
  • 2 tsp dried oregano
  • 1 tsp basil
  • ½ tsp cayenne pepper
  • ½ tsp sea salt
  • 1 tsp black pepper
  • ½ tsp salt (optional - the Italian sausage has a good bit of salt so feel free to omit)

What To Do:
  1. Brown ground beef and sausage in a skillet until no pink remains, remove from heat, drain the fat and set aside.
  2. Place the olive oil in the bottom of a 4-6 quart stock pot.
  3. Add the prepared sweet potato, carrots, zucchini, shallots, and garlic and saute for about 1 minute, stirring often.
  4. Pour in canned tomatoes and broth.
  5. Add the spices and stir it all together.
  6. Add in the cooked beef/sausage and let simmer on low for 45 minutes to an hour.
    Note: this dish can also be combined in a crock pot and cook on low for 6 hours.


Note: you don't have to julienne the veggies. They could easily be chopped (just a rough chop, the small size is not necessary). I personally like to prepare them this way because the long strings of sweet potato and zucchini resemble the pasta I associate with traditional minestrone.

One of the best parts of this recipe (imho) is that you can pretty much make into whatever you want. If you would like to add some crunch, add a bit of chopped celery. I am told that chopped spinach (½ cup) or kale also works really well. If you want to switch out yellow onions for the shallots because that is what you have on hand, or maybe you have a couple of mushrooms in the fridge, feel free to make your substitutions!

The truth is, this is just a good, hearty, clean out the fridge/pantry kind of soup. And no matter how you mix it up, it is sure to satisfy!