Tuesday, February 25, 2014

Paleo Pockets (Empanadas)

I have not been feeling my best the last few weeks. And one side effect of my condition is that I am craving high flavor food more than ever. That is due partly to the fact that I haven't been able to taste food that isn't super savory and, of course, when I feel less than my best, I start looking for more of my favorite comfort foods.

But I have to remember, that on these days when I am feeling under the weather, I need good quality foods more than ever.

Enter these little beauties! They are based on the Fabulous Flat Bread recipe I shared a while back and a tried-and-true family recipe for the filling. These little treats are sure to satisfy whether you are craving comfort foods or just want a Tex-Mex taste to top off your day.


Paleo Pockets (a.k.a. Empanadas)

Stuff You Need:
  • ½ cup almond flour
  • ½ cup tapioca flour
  • ½ cup milk + 1 Tbs milk
  • salt (pinch)
  • 1 lb ground beef
  • ½ yellow onion, finely chopped
  • yellow or orange bell pepper, finely chopped
  • 1 jalapeno, seeded, finely chopped
  • ½ cup raisins
  • ¼ cup slivered almonds
  • 1 tsp cumin
  • 1 tsp chilli powder
  • 1 tsp garlic powder
  • ½ tsp black pepper
  • ½ tsp sea salt
  • 2 Tbs butter or ghee, melted
What To Do:
  1. Preheat your oven to 350F.
  2. First we'll prepare our crust/tortillas... put the almond flour, tapioca flour, and salt in a bowl and combine, breaking up any clumps - I use a wire whisk for this, but a fork will work just as well.
  3. Stir in the milk until it reaches the consistency of pancake batter, add more or use less as needed - different brands of almond flour may require a bit more or less depending on how finely it has been milled. You should end up with enough batter for 4 good sized tortillas.
  4. Next, heat a nonstick pan over medium heat and pour ¼ of your batter into the pan. Swirl the pan around to thin out your tortilla to your desired size/thickness.
  5. As soon as you are able, flip over your tortilla and brown the other side. You want your tortilla slightly under-cooked. We'll finish it off in the oven.
  6. After all 4 tortillas are browned on both sides, set them aside until ready to fill.
  7. Now to prepare the filling ... start by browning your ground beef until no pink remains.
  8. Next, drain the beef to remove as much fat as possible and then return the mixture to the skillet.
  9. Next you need to add the onions, bell pepper, and jalapeno to the pan. Saute with the beef until the onions are translucent.
  10. Next, add the raisins and dry spices. Let the mixture cook for a couple of minutes, stirring often, to release the flavor of the spices.
  11. Now we're ready to assemble our empanadas... place a tortilla on a parchment lined baking pan and fold in half.
  12. Lift the tortilla and spoon about 2 - 3 Tbs of the meat mixture inside the fold. Use a fork to crimp the edges shut. Note: since the tortillas are under cooked, this is not difficult and should not require any binder to hold them together. If you run into trouble, you can brush a bit of the melted butter/ghee along the edges to help them stick together while crimping with the fork.
  13. Repeat with the remaining tortillas.
  14. Now you need to brush the tops of your empanadas with the melted butter/ghee.
  15. Bake at 350F for 10-15 minutes, until tortillas finish cooking. They will have a nice golden color once they are done.
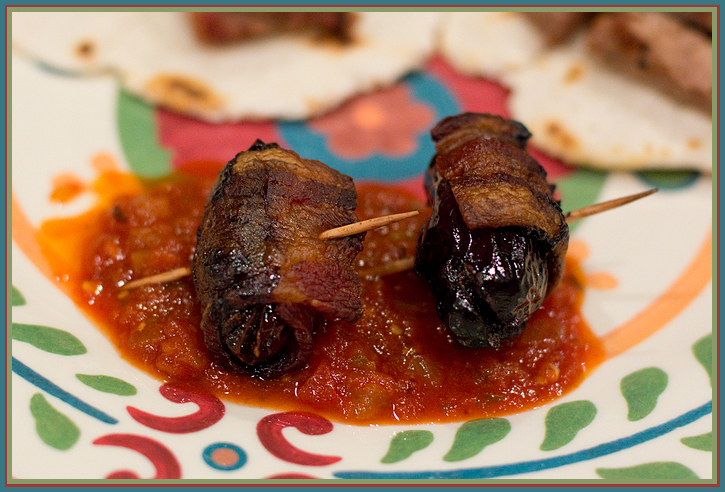
  16. Serve with salsa and ENJOY!

You will note that you will have a LOT of left over meat mixture. This makes for FABULOUS left overs. You can always make more empanadas (& I highly recommend that you do so), but this filling is also great along side fried eggs for breakfast, wrapped up in butter lettuce, or topping a killer taco salad! You really can't go wrong with it! This also freezes well so you can always have some when you need a quick week-night meal.

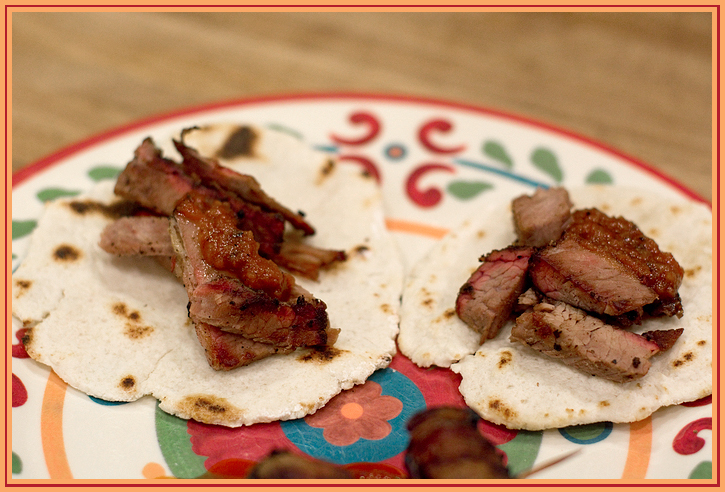
You can fill your empanadas with just about any filling that suits your fancy. The first night we tried these, I filled them with my Crock Pot Carnitas. If you are not strict Paleo, these would be AWESOME stuffed with melted cheese and onions. MMMMMMM I start drool just thinking about it. And there are sweet fillings as well - think apple pie kind of fillings. I haven't tried this yet, but you can bet I'll be back to update the site once I do!

I hope you will enjoy these as much as we have. They have become an instant favorite and they are so flexible and offer so many different options, depending on how you are feeling on any given day. It doesn't get much better than that.

Wednesday, February 19, 2014

Tasty Tenders

In looking back over my most recent posts, it would seem that I spend a lot of my time trying to find "Paleo-ified" versions of the foods we've had to cut out of our diet.

In reality, we don't actually spend a lot of our time on these efforts, but with the onset of cold weather and an upper respiratory infection that I just can't seem to shake, I'll admit to craving more comfort foods than usual.

However, the goal in my cooking, both before and after the switch to a Paleo-ish diet, has been bold flavors. I have found that the key to keeping my eating in check is having truly flavorful foods on my plate. You might find that counter intuitive - surely if the food tastes awesome, it'll just entice you to eat more, right? I have found the opposite to be true. When the food bursts with flavor, I eat my portion and feel satisfied. But when the dish is lacking in flavor, I find myself searching the kitchen for something more to fill that void.

The recipe I am sharing today is one that truly satisfies. It's taken quite a few attempts to get this one right, but now it is a dish that the whole family enjoys!

These chicken tenders were inspired by Arsy over at Rubies and Radishes. She has so many inspiring recipes, I highly recommend that you click over and check them out for yourself! This recipe for Paleo Chicken Tenders was the first one I tried from her site but it has not been the last!

Tasty Tenders

Stuff You Need:
  • ¾ cup plantain chips, ground
  • ¾ cup tapioca flour
  • ½ teaspoon cayenne
  • ½ teaspoon dried oregano
  • 1 teaspoon onion powder
  • 1 teaspoon garlic powder
  • ½ teaspoon ground black pepper
  • ½ teaspoon sea salt
  • 2 eggs, lightly beaten
  • coconut oil for frying
  • 1 lb. organic chicken tenders
What To Do:
  1. Preheat the oven to 350F.
  2. Grind your plantain chips in a food processor until you reach the consistency of a course ground flour. You can keep grinding until it has a finer texture, but I personally like a more course grind.
  3. In a shallow bowl or pie pan, combine chips, tapioca flour and spices.
  4. In another shallow bowl, beat the eggs together.
  5. Dredge the chicken tenders one piece at a time in the flour & spice mixture. Shake off the excess flour, then dip the chicken tenders in the egg and then once again dredge them in the flour.
  6. Melt your coconut oil in a heavy skillet over medium heat and add the chicken strips. Don't crowd the skillet, it is OK to cook these in batches.
  7. Cook your tenders for 2-3 minutes on each side. This will give a nice crisp to the flour coating.
  8. Transfer the tenders from the skillet to a foil-lined roasting pan.
  9. Bake at 350F for 10-15 minutes, until no pink remains in the tenders.
  10. Remove from the oven and place on a plate lined with paper towels to drain off any remaining oil.

This recipe is pretty darn close to the original I found over at Rubies & Radishes. The big difference is that I don't finish cooking these in the coconut oil in the skillet. I tried multiple times to get them just right, but inevitably found that either the coating scorched (my heat was too high) or they tasted too oily (when I lowered the heat). So my compromise was to just kind of brown them in the oil in the skillet and then finish them off in the oven. This process only added a few minutes to the total prep time and the end result was well worth it! The strips were crispy and light tasting.

The spice mixture has a nice bold flavor, but don't be afraid of the cayenne. Wonder Boy is not a fan of spicy foods and he has given this his stamp of approval as-is.

I hope you and your family will enjoy them as much as we have!

Monday, February 17, 2014

Bacon-Wrapped Sausage-Stuffed Dates

I've been promising to get this gem of a recipe shared here for about 2 weeks now. And my intention was to get it up here ASAP so that everyone within earshot blog-shot could enjoy it in all of it's savory, sweet goodness. But life sometimes gets in the way. And sometimes you come down with the flu. UG.

But I digress ... you are here for something special, so feast your eyes on THIS ...


I know, right?!

And to be honest, this picture just does not do it justice. In fact, I can see I am just going to have to make these again soon so that I can try to get a better shot for you.

I stumbled on this magnificent idea while browsing the amazing recipes over at Paleoaholic. Like so many of my favorites, these come together quickly and with very little fuss and they deliver such a powerful punch of flavor that they were an instant favorite of everyone that has tried them (& we've been sharing these at every opportunity).

Bacon-Wrapped Sausage-Stuffed Dates

Stuff You Need:
  • 15 Medjool pitted dates
  • sausage (I used a local spicy jalapeno sausage)
  • 5 slices bacon, cut into thirds crosswise
  • 15 toothpicks
What To Do:
  1. Preheat the over to 400F.
  2. Slice sausage lengthwise. Then slice off 15 - ¼ inch semi-circles of sausage.
  3. Slice your dates in half and place a semi-circle of sausage in each.
  4. Wrap each stuffed date with bacon and secure with a toothpick.
  5. Bake for 30-40 minutes, until the bacon is nice and crispy. Flip them at about the 15 minute mark so that both sides will be equally crispy.
And that, folks, is all she wrote! You'll want the dates to cool at least a little before enjoying, but it's hard to wait because these will simply call to you from the oven. Your tongue will thank you for a little restraint though.

As usual, I've made a few adjustments to the original recipe. First off, the original calls for Spanish chorizo. I didn't have any the day I first planned to make these and then I loved them so much with the spicy jalapeno sausage that I just stuck with it. And second, the original recipe calls for the addition of a spicy tomato sauce. As you can tell from my picture, I did serve it that way at least once. But in all honesty, I didn't feel like it truly added anything to the dish, so I only served it that way the first time and we haven't missed it one bit.

I served these as a special treat on Super Bowl Sunday. We've shared them with friends at a pot luck dinner. And we've whipped them up just to kick up a weeknight meal. They are a wonderful treat that can turn any day into a special event.

And I hope you will enjoy them as much as we have!

Monday, February 3, 2014

Grain Free Tortillas

I know my last post was about flat bread, but the very next day after posting it, I stumbled across THIS recipe for a "true tortilla" over at the Health Starts in the Kitchen blog.

I literally went home and tried the recipe that very night! But alas, I did not have a critical piece of equipment - the tortilla press.

I tried to just roll it out with a pin, but it made the BIGGEST mess. However messy, the results were still very promising. So Wonder Dad and I went out on a hard target search for a tortilla press at our first opportunity and did not come away disappointed.

On Super Bowl Sunday, I decided to christen the new press with a fresh attempt at Hayley's tortillas, with a couple of modifications.

Hayley's Grain-Free Tortillas

Stuff You Need:
  • ½ cup blanched almond flour
  • ½ cup arrowroot powder (+ extra to dust your tortilla press)
  • ¼ tsp sea salt
  • 4 - 6 Tbs water
What To Do:
  1. Combine dry ingredients in a medium sized bowl and mix well.
  2. Add water 1 Tbs at a time just until your dough will hold together. NOTE: Hayley's recipe called for 3 - 4 Tbs of water. I don't know if it is due to the humidity in the air (or lack thereof), the brand of almond flour/arrowroot powder I have been using, or what, but even 4 Tbs was not enough to get my dough to hold together. I ended up using 6 Tbs each time I tried this recipe. So my advise is to do just as suggested, start with just a single Tbs and work your way up until the dough holds together.
  3. Using additional arrowroot powder as needed, divide your dough into 4 equal parts and roll into balls.
  4. Line your tortilla press with plastic shopping bags (see, they're good for SOMETHING) and lightly dust with arrowroot powder.
  5. Press down your ball of dough, peel off the press and place in a cast iron skillet that has been preheated over medium heat.
  6. Cook on each side until it starts to get light brown spots (about 1 - 2 minutes per side).
  7. Top with your favorite toppings and EAT UP!

Please note that, along with changing the amount of water used, I also changed the amount of salt. In fact, I cut it in half from what Hayley had suggested. This is a personal preference. I think it works very well without the added salt, but if you want a bit more zest in your tortilla, then feel free to add a bit more.

Like the flat bread recipe, this one is super simple and features only a handful of ingredients. They come together pretty quickly and the results are super tasty! I hope you will enjoy them as much as I have!