Monday, March 31, 2014

Cocoa-Crusted Slow Cooker Pot Roast

Wonder Boy has a ... how do you say it? ... let's be polite call it a "selective palate," which means I am constantly on the lookout for foods that the whole family can enjoy (so I don't end up making multiple dishes for each meal). And when I find one that works, well, I tend to shout it to the roof tops.

This is one of those rare gems that truly earns the label of family favorite! The fact that it's a crock pot meal to boot is just a bonus!

Cocoa-Crusted Slow Cooker Pot Roast

Stuff You Need:
  • 3 lb chuck roast
  • 2 Tbs cocoa powder
  • 1 Tbs sea salt
  • 1 tsp black pepper
  • 1 tsp garlic powder
  • ½ tsp habanero chili powder
  • ½ dried oregano
  • 1 Tbs grapeseed oil (or olive oil)
  • 1 cup beef broth
  • 1 large onion, quartered
What To Do:
  1. Combine the dry seasonings in a small bowl.
  2. Rub the spice mixture over your roast and refrigerate for 30 minutes (over night is great, if you think about it before hand).
  3. Heat the oil in a heavy bottomed pan (I use a cast iron skillet) over medium hat.
  4. Once the oil is hot (when it starts to shimmer, but before it begins to smoke) add your onions to the pan and let them cook until slightly browned.
  5. Separate the onions and line the bottom of your slow cooker with them.
  6. Add the broth and set aside.
  7. Brown your roast on each side, until you have a nice crust, 2-3 minutes per side.
  8. Transfer the roast to your slow cooker, place on top of the onions, and cook on low for 8 hours.


This comes out of the crock pot ready to fall right apart for you! It's juicy and tender and full of flavor.

We like to serve it with a side of tarrow root fries, snappy apple slaw, or just a fresh green salad.

I hope you will enjoy it as much as we have!

Friday, March 28, 2014

Sour Sippers

In our efforts to put only "clean things" into our bodies, we recently gave up most (if not all) of our artificially sweetened drinks. I was enjoying at least one flavored water per day. But it was sweetened with apertame or some other chemical. So it had to go. That left us with water as our primary sipper throughout the day.

And that's fine. We've been drinking primarily water for a good long while.

But every now and then (about 1 meal per day), I really like to have some kind of sweet and/or snappy treat. so I started sampling lemonade recipes. It took a while, and a bit of tinkering, before I found the right sour sipper for me.


Sour Sippers

Stuff You Need:
  • 10 - 14 lemons (enough for 1 cup of lemon juice)
  • 4 - 6 limes (enough for ½ cup lime juice)
  • ½ cup agave nectar
  • 6 cups water
What To Do:
  1. Warm the water on the stove over medium heat. It doesn't need to boil or even simmer, we just want it hot enough to help the agave dissolve.
  2. Add the agave nectar and stir until dissolved.
  3. Add lemon & lime juices, stir until well mixed.
  4. Refrigerate until cold and enjoy!

I like to garnish my drinks with frozen fruit instead of ice cubes. Raspberries and blackberries are my favorites, but pineapple chunks and strawberries are also very flavorful.

I find this to be a nice, snappy, and down right refreshing drink. I have gotten into the habit of enjoying a small glass at lunch each day, especially now that the sun is starting to shine on us again. It's a perfect compliment to a fresh tuna salad or lettuce wrap, but honestly, I enjoy this little treat all on its own. I hope you will as well!

Monday, March 17, 2014

Building a Better Burger

OK. So here I sit again, telling you all about a craving I've had that just wouldn't go away. This time, it was the almighty hamburger that has been calling my name. Perhaps it's due to the gazillion burger commercials on TV. I don't know the reason, but I'll admit that a good burger is one of those dishes that I miss. There are few meals as satisfying as a nice, juicy burger - I don't even need the fries with it. A good burger is satisfaction on a plate, in my book.

So ... what's a Paleo kitchen supposed to do with such a craving? I have tried my hand at several Paleo breads, but none have been truly satisfying.

But then inspiration hit! And I decided to "super size" one of my favorite plantain treats to serve as the "bun" of my Paleo burger. And let me just say now for the record ... this has been one of my better ideas! Check it out!


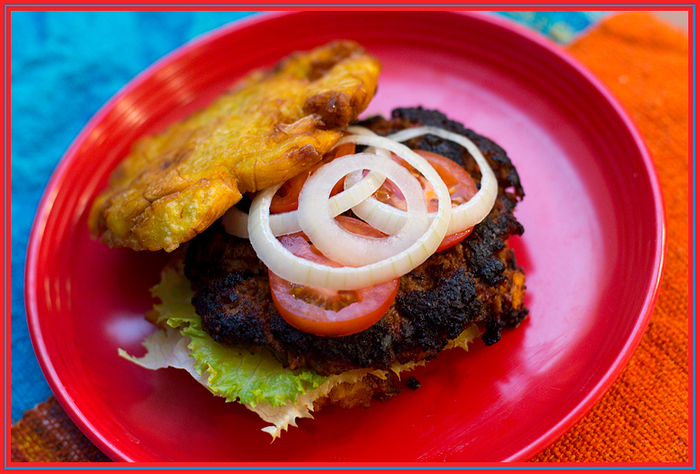
This burger is only a quarter pound patty, but it was so filling and satisfying that I could only eat about half of it (yay for yummy left overs!). And while, in the future, I may downsize to slider-size, this was an AWESOME Sunday night special supper.

Paleo Burger on Tostones:

Stuff You Need:
  • 2 green plantains
  • 1 cup coconut oil
  • sea salt (for sprinkling)
  • ½ lb extra lean ground beef
  • 2 oz. chorizo
  • ½ cup crushed plantain chips (any other "paleo" chips would work as well)
  • ¼ tsp garlic powder
  • ¼ tsp onion powder
  • ¼ tsp red pepper flakes
  • 1 tsp yellow mustard
  • 1 tsp agave ketchup

What To Do:
  1. First, we make the plantain "buns". To do that, peel your plantains and slice them in half crosswise.
  2. In a deep frying pan over medium heat, melt your coconut oil.
  3. Once the oil is hot, add the plantain stalks into the oil standing on one end.
  4. Fry until one side is golden brown, flip, and fry the other side until golden brown as well.
  5. Remove from the heat and place on plate lined with paper towels to drain off any excess oil.
  6. One at a time, place your plantain chunks between sheets of parchment paper and smash with a plate to about a ¼ inch thick.
  7. Add the flattened plantain patties back to the oil and fry until crispy and golden brown. Keep an eye on them as this happens pretty quick.
  8. Remove from the oil and place on towel-lined plate to drain.
  9. Sprinkle them with sea salt and set aside while you prepare your burger.
  10. Mix all remaining ingredients in a bowl, divide in half, and shape into quarter pound patties.
  11. Brown both sides in a well-oiled pan. Cook until no pink remains.
  12. Place your burger on one of your plantain patties, add burger fixings (like lettuce, tomato, pickles, and onions), and top with a second plantain patty.
And that's it folks!

Please note ... this is a very calorie dense meal. Usually, when I prepare tostones, I will get at least 3 servings out of a single plantain. Sometimes, I can even get 4 servings. In this recipe, you get only 2 per plantain. So unless your have very small plantains, this will double the number of calories consumed.

With that in mind, we don't serve these with any side dishes.

Regardless, this was truly satisfying and my burger craving is no longer tickling my tongue to be naughty!

Wednesday, March 12, 2014

Snappy Apple Slaw

This little side dish is a true go-to recipe for me. When faced with a pot luck dinner, a special family gathering, or just a weeknight meal in need of a little pizazz, this is one of the first dishes I consider.

It's taken a while to get the proportions down just right, as this is an adapted recipe from our pre-Paleo days. And the original had a very healthy (ahem) serving of sugar in it. We decided to try shredded apple in the dressing to sweeten things up, added a touch of honey, changed the type of vinegar, and BINGO - we had the sweet and snappy treat we were craving.

To speed things up, I use a pre-packaged bag of slaw. But shredding the fresh stuff is a great option when you have the time!

Snappy Apple Slaw

Stuff You Need:
  • 1 - 16 oz. bag pre-packaged slaw mix
  • 3 Tbs sesame seeds, toasted
  • ½ cup slivered almonds
  • ¼ cup honey
  • ¼ cup apple cider vinegar
  • ¼ cup grape seed oil (lite olive oil will work as well)
  • ¼ tsp sea salt
  • ¼ tsp ground mustard
  • ½ tsp garlic powder
  • ½ tsp black pepper
  • 1 large apple, peeled and shredded
What To Do:
  1. Combine slaw, toasted sesame seeds, and slivered almonds and set aside.
  2. Warm honey in the microwave for 30 seconds.
  3. Combine honey and the remainder of ingredients in a medium bowl to make the dressing.
  4. Just prior to serving, pour the dressing over the slaw and toss well.


This recipe comes together pretty quickly. In fact, shredding the apple is probably the longest single step. When I make this for a pot luck or some other dinner where we are bringing a dish, I will carry the dressing in a separate bowl, which I warm for 10 - 15 seconds in the microwave (to make the honey pour more smoothly) just before mixing and serving.

We like to change up this recipe from time to time and add mandarin orange slices or switch out the slivered almonds for pecans. I think blueberries would also be fun to try and maybe switch out walnuts for the almonds. The possibilities are limitless!

I hope you will enjoy this snappy side dish as much as we do!

Monday, March 3, 2014

Bacon-Wrapped Yams

I do most of my involved cooking on the weekends. There just isn't enough time on a typical weeknight to spend more than a few minutes getting dinner on the table. So typically, I try out new recipes on the weekends and I will often cook up a number of main dish entrees so I'll have something I can put on the table quickly before judo or soccer practice. However, this often leaves me looking for a suitable side dish on any given week night.

When that happens, THIS is one of my favorites to pull out of the cupboard!


These DO take about 45 minutes all together before they can make it to the dinner table, but they are SO worth the effort. And if all I am doing is heating up the main entree, it's not such a hassle to put a bit of extra effort into this side dish.

Bacon-Wrapped Yams

Stuff You Need:
  • 1-2 medium sized yams/sweet potatoes
  • 3-5 strips of bacon
What To Do:
  1. Preheat the oven to 425F.
  2. Peel and cut your yams into ½-inch thick french fries.
  3. Cut your bacon into thirds, crosswise. And then cut again in half, lengthwise. You should get 6 bacon strips out of each piece of bacon.
  4. Wrap each strip of bacon around one of your yam fries.
  5. Place your bacon-wrapped yam fries on a wire rack over a foil-lined baking sheet.
  6. Bake for about 30 minutes at 425F or until your yams are golden brown and your bacon is starting to crisp. There is no need to turn your fries mid-way if you use the wire rack since air can circulate all around them.
  7. Remove from the oven and place on a plate lined with paper towels to drain off any remaining grease.
And that, folks, is all she wrote! I have a handy, dandy potato slicer which helps to make quick work of the yams. If you have one, a vegetable spiral slicer would also work really well to speed up the prep work on this dish. Even a mandolin slicer can help if you are in a rush.

But regardless of how you slice them up, this side dish comes together pretty quickly. It carries a wallup of flavor and is sure to please even the pickiest of eaters.