Monday, August 31, 2020

Salsa Chicken Flautas

As you know, I am all about the super simple, easy-to-prep meal. It doesn't get much easier than what we call "Salsa Chicken." Dump a few things in the InstaPot, set it, and forget it!

Once it comes out of the InstaPot, there are so many dishes you can make with this shredded chicken, but our current favorite way to enjoy it is in the form of crispy flautas!


Salsa Chicken Flautas

Stuff You Need:
  • 3 chicken breasts or 4 chicken thighs, skinless
  • 1 - 15 oz. jar salsa
  • corn tortillas
  • canola oil
  • tooth picks
What To Do:
  1. Place chicken in bottom of InstaPot, top with entire jar of salsa and 1 cup water;
  2. Cook on high pressure for 25 minutes, natural pressure release for 15 minutes.
  3. Remove chicken and liquids from instapot and shred with 2 forks.
  4. Add enough oil to a cast iron pan to give you about .5" of oil and turn heat to medium. Oil is ready once it starts to slightly shimmer.
  5. Lightly fry the corn tortillas to soften them up - it takes only a few seconds, maybe 10-15 seconds per tortilla and it just softens them enough so they don't break when you roll them.
  6. Put about 2 Tbs of the shredded chicken on each tortilla, roll, and secure with a tooth pick. I like to roll out all of my flauta before I begin frying them so I can pay full attention to them while they cook.
  7. When you are ready, place your rolled flauta in the oil, seam side down, and fry about a minute per side, rotating until you reach desired crunchiness.
  8. Transfer cooked flautas to a plate lined with paper towels to drain excess oil.
  9. Serve with your favorite salsa, queso, or other dipping sauces and ENJOY!

This shredded chicken is so versatile. I like to use it for salads, enchiladas, to stuff empanadas or as a topper for tostones. Hope you enjoy this as much as we do!

Al Pastor Pork

We tried this recipe for the first time about 3 years ago and it instantly became a family favorite. We affectionaly call it the "Meat Tower" and it is one of those dishes that will make your mouth water from the moment you whisk up the marinade until you are able to take that first bite!

These days we generally cook this outside on the Big Green Egg, but it can also be done in the oven. It takes a couple of hours to cook though, so if it were not for the Big Green Egg, we would only make this during the cooler months.

We like to serve this on tortillas, corn for Wonder Dad and myself, flour for the kiddo. We top it with fresh pico de gallo and/or salsa. My favorite was a pineapple relish/salsa we threw together with leftover fresh pineapple. YUM!

We made this one of the signature dishes we prepared for a family Christmas meal a few years ago and we still get requests to bring it to get-togethers. I hope you will enjoy it as much as we do!


Al Pastor Pork

Stuff You Need:
  • 5 lb boneless pork shoulder
  • 3 tablespoons achiote paste
  • 2 tablespoons ancho or chipotle chili powder
  • 1 tablespoon garlic powder
  • 1 tablespoon dried oregano
  • 1 tablespoon cumin
  • 1 tablespoon salt
  • 1 tablespoon pepper
  • ¾ cup white vinegar
  • 1 cup pineapple juice
  • 1 pineapple, skinned and sliced into 1-inch rounds
  • tortillas (corn, flour, etc.)
What To Do:
  1. Slice the pork shoulder into about 1-centimeter (¼ in) slices, then transfer to a large dish or bowl.
  2. In a medium bowl, combine the achiote paste, chili powder, garlic powder, oregano, cumin, salt, pepper, vinegar, and pineapple juice, mashing and stirring until smooth with no lumps.
  3. Pour the marinade over the pork slices, then toss to make sure they are coated on all sides. Cover the bowl with plastic wrap, then refrigerate for at least 2 hours or up to 3 days.
  4. Place a slice or two of the pineapple on the meat skewer. I've been using this Brazillian Gaucho Skewer since it is free-standing. I like to place it in an aluminum pie plate or something like that to catch the drippings on the grill.
  5. Remove the pork from the fridge and push the slices through the skewer, layering one after the other until there is a 1-inch (2 ½ cm) gap at the top. Push another pineapple slice on top.
  6. Get your grill up to about 300F and place your meat tower in the center of the grill, indirect heat if at all possible. Cook for 2 to 2.5 hours. I like to baste with extra pineapple juice every 20-30 minutes.
  7. If you are preparing indoors, heat oven to 350F, remove all be the lowest rack and bake for 2-3 hours. As with the grill, I like to baste with extra pineapple juice every 20-30 minutes.
  8. Once the pork reaches an internal temperature of at least 160F, rest the meat for about 10 minutes, then carve off thin slices of pork.
  9. Serve on tortillas (corn or flour, your choice!), top with salsa, pico de gallo, or cilantro and diced onions as desired.


Monday, July 13, 2020

Mongolian Meatball Ramen

Who here can recall the song that goes ... "One of these things is not like the other. One of these things is not the same."? If you can, you are O-L-D like me!

But regardless, this recipe is going to be one of those things. Up until now I have used this space for gluten-free, "Paleo" recipes. We gave up on sticking to that eating plan a few years ago. We still eat many of these recipes, but we don't focus on staying within those guidelines any more.

And as such, the recipes I am planning to share here will not necessarily be of that ilk going forward. However, they are still some of my favorites and I want a place to keep them in case the bookmarks on them expire or I just forget the changes I made.

Today I'd like to share a recipe that has quickly become a family favorite! Wonder Boy is not a fan of ground beef (I have no idea where that came from) so for him, I typically prepare some other form of protein and only serve the noodles to him. He LOVES the noodles though, so it's really not a big deal that the meatballs are not his favorite - that just means more for his dad and I! And if we run out of noodles before we finish the meatballs, they serve well with rice or even zoodles (see! I can still twist things to be Paleo friendly)


Mongolian Meatballs

Stuff You Need:
  • 1 lb. ground beef
  • ½ cup Panko bread crumbs
  • 3 green onions, thinly sliced, divided
  • 1 egg
  • 2 cloves garlic, minced
  • 2 tsp sesame oil, divided
  • red pepper flakes
  • black pepper
  • ¾ cup low-sodium chicken broth
  • ½ cup low-sodium soy sauce
  • ¼ cup brown sugar
  • 2 Tbs Hoisin sauce
  • 3 pkgs Instant Ramen
  • toasted sesame seeds, for garnish
What To Do:
  1. In a large bowl, combine ground beef, panko bread crumbs, about half of the green onions, egg, garlic, and 1 tsp of the sesame oil. Season with red pepper flakes and pepper to taste.
  2. Mix until well combined. To form meatballs, scoop a heaping tablespoons of mixture and roll into balls. Alternately, I've been using this meatball try. It really speeds up the process of forming the meatballs and makes certain that they cook evenly.
  3. In a large skillet over medium-high heat, heat a thin layer of vegetable oil. Add meatballs and sear until each side develops a crust, about 2 minutes per side.
  4. Remove meatballs from skillet, and add remaining sesame oil.
  5. Add chicken broth, soy sauce, brown sugar, and hoisin. Stir to combine and bring to a simmer.
  6. Return meatballs to skillet and cover skillet with a lid. Cook until meatballs are cooked through, about 10 minutes more.
  7. Meanwhile, boil the ramen noodles according to the package instructions, but omit one of the 3 flavor packets.
  8. Once the meatballs are done, remove temporarily from the pan.
  9. Drain the noodles, add them to the meatball pan and toss to coat with the sauce.
  10. Return the meatballs to the pan, garnish with remaining green onions and toasted sesame seeds, and serve! Be ready for a flavor explosion!

The original recipe called for a lot more salt, both in the meatballs and by using all of the flavor packets with the ramen noodles. It was too much for us, but feel free to add it back if you like.

Thursday, November 13, 2014

Stick-to-Your-Ribs Crockpot Stew

We had something rare blow into these parts of Texas yesterday, a cold front - an actual COLD front - not just one of those day-long, breath of fresh air kind of fronts that only leaves you wanting more. It's shivering weather. And when the thermostat approaches the freezing point, I start craving good, hearty foods.

And one such feel good food is stew. I had a few recipes in my binder, but they were from our pre-Paleo days and just wouldn't do. So I combined a few ideas, made a few substitutions, and came up with this:

Stick-to-Your-Ribs Crockpot Stew

Stuff You Need:
  • 2 lb. beef, cut into bite-sized pieces
  • ½ lb. Italian sausage
  • 1 yellow onion, cut into large chunks
  • 1 large zucchini, cut into large chunks
  • 1 orange bell pepper, cut into large chunks
  • 1 yellow bell pepper, cut into large chunks
  • 1 red bell pepper, cut into large chunks
  • 1 - 4 oz can tomato paste
  • 1 - 14 oz can diced tomatoes
  • 2 Tbs apple cider vinegar
  • 2 chipotles in adobo, finely chopped
  • 2 cups beef broth
  • 1 Tbs garlic powder
  • ½ tsp onion powder
  • 1 Tbs black pepper
  • ½ tsp cayenne
  • ½ tsp thyme
  • 1 tsp oregano
What To Do:
  1. Crumble sausage into a skillet and brown until no pink remains.
  2. Remove sausage by slotted spoon and drain on a paper towel-lined plate.
  3. Use reserved grease from sausage to brown beef. I like to do this in small batches to prevent excess water build up.
  4. Place beef and sausage in the crock pot.
  5. Next sauté the veggies in your skillet for a minute or two, stirring often.
  6. Place veggies in the crock pot.
  7. Use apple cider vinegar to de-glaze you skillet.
  8. Add beef broth, tomatoes, and tomato paste to the skillet, mixing until tomato paste fully incorporated.
  9. Add the dry spices and mix well.
  10. Pour liquids from the skillet to the crock pot.
  11. Cook on low for 8 hours.


I can't tell you how comforting this dish has been. I have eaten it for lunch and dinner 2 days running. And I'm not TOO embarrassed to admit that I had it for breakfast today as well.

It's also a really versatile recipe. These are just the veggies we had on hand. If you've got something else around - sweet potatoes, okra, mushroom - whatever is on hand or whatever sounds good to you, just pop 'em in. Don't have Italian sausage handy, use ground beef or breakfast sausage or even chorizo. This is really one of those clean out the fridge kind of meals.

I sautéed all the veggies, but that is really a personal preference. Aside from browning the sausage and beef, you could get away with just dumping this all in the crock pot. And if I had been short on time, I likely would have considered that option. But, for a change I had some time on my hands, so I pulled out all the stops.

Regardless of the changes you make, I think you will find this a great cold-weater feel good meal!

Thursday, September 11, 2014

Orange Chicken

I guess I should start with lots of apologies. It's been AGES since my last post. And I have no real excuse. Sure, work is busy. But what else is new? I have been experimenting in the kitchen. Sometimes, it's just tweaks to a familiar dish, others it's a big leap of faith.

And such is the case with this particular dish.

You see ... I just love Asian flavors. And orange beef, chicken, and shrimp are some of my ALL TIME favorites. But typically, these meals are loaded with sugars. So I have stayed away from them except on special treat days. However, early last week, I was browsing a non-Paleo food blog (The Pioneer Woman) when I stumbled over an excellent-looking take on orange chicken.

But since it's more than a month before my birthday, I decided I would attempt to Paleo-ify her recipe (thus the leap of faith). And this is what I came up with:

Orange Chicken

Stuff You Need:
  • 1 - 1.5 lbs chicken tenders, cut into bite-sized pieces
  • 4 egg whites
  • 2 Tbs tapioca powder
  • ½ cup orange juice
  • 1 Tbs coconut aminos (or soy sauce, if you are not strict Paleo)
  • 1 Tbs honey
  • 1 Tbs vinegar
  • ¼ tsp grape seed oil
  • ¼ tsp sea salt
  • ½ tsp crushed red pepper (or more to taste)
  • 1 clove garlic, minced
  • 1 tsp ground ginger
  • 1 tsp tapioca powder
  • zest of 1 orange
  • ¼ cup water
  • 2 whole green onions, chopped
What To Do:
  1. For the chicken: In a large bowl, whisk together the tapioca powder and egg whites with a fork until almost frothy, about 1 minute.
  2. Add the chicken to the mixture and allow to sit for 5 to 10 minutes.
  3. For the sauce: Put the orange juice, coconut aminos, honey, vinegar, grape seed oil, salt, crushed red pepper, garlic, ginger, and orange zest in a small nonstick skillet and whisk together.
  4. Heat 3-4 minutes until it starts to bubble and thicken.
  5. Whisk together the tapioca powder and 1/4 cup water in a small bowl or cup until well combined.
  6. Add 1 or 2 Tbs of the tapioca powder slurry to the sauce and mix well.
  7. Continue to stir while sauce thickens (for about 1 minute). NOTE: If sauce gets too thick, just add in another 1/4 cup water and whisk in. If sauce is too thin, add another Tbs of the tapioca powder slurry until it reaches a nice syrupy consistency.
  8. Heat about 2 inches of coconut oil in a heavy-bottomed pot until a deep-fry thermometer inserted in the oil registers 350 degrees F.
  9. In small batches, carefully drop a few pieces of chicken into the oil, stirring often for 2-3 minutes or until light golden.
  10. Remove from the oil and let the chicken drain on a plate lined with paper towels for 2 to 3 minutes.
  11. Once all of the chicken has been browned, drop them back into the oil for 1 more minute to really solidify the coating.
  12. Remove from the oil again and return to the paper towel lined plate to drain.
  13. Finally, toss the chicken in the sauce and serve immediately with orange zest and sliced green onions for garnish.


This is basically the recipe for Orange Chicken featured on the Pioneer Woman's site, with just a few substitutions. I traded tapioca powder for corn starch, honey for her brown sugar, grape seed oil for sesame oil, and coconut oil for peanut oil.

The results were AWESOME! We just LOVED this dish and you can bet it's one I'll be repeating in the very near future (I have a surplus of orange juice. That's my excuse and I'm sticking to it!

Tuesday, May 6, 2014

Fabulous (Taro) Fries

I know it's been a while ... I'm still experimenting in the kitchen and have a bit more tweaking to do before I get to share some new favorites with you.

But in the meantime, I wanted to let you in on a little secret ....

Taro root fries are seriously addictive!

These have become a family fave to the Nth degree and are Wonder Boy's favorite fry ever. He even prefers these fries to those you would get at your favorite (ahem) fast food establishment. That's not to say that he's a fan of all Paleo-ish foods I put down before him, but this is a MAJOR SCORE in my book and I'm going to enjoy it!


As a bonus, taro root is seriously inexpensive (a $3 USD jumbo taro root will last our family about a 3 weeks, even with me preparing it at least twice a week) and these little shoestring fries are super simple to make! I have baked them and fried them and either way works well. For seasoning, my crew prefers just a bit of sea salt, garlic powder, and black pepper. You can slice them super thin and make chips or you can make thick slices like home fries. It really IS up to you this time!

This is the way I most commonly prepare and serve our favorite tuber:

Baked Taro Fries

Stuff You Need:
  • 1/4 of a taro root, peeled, sliced thin, and cut into strips
  • 3 - 4 Tbs grape seed oil
  • 1/2 tsp sea salt
  • 1/2 tsp garlic powder
  • 1/2 tsp black powder
  • 1/4 tsp kosher salt
What To Do:
  1. Preheat oven to 350F.
  2. Place your taro fries on a parchment lined baking sheet.
  3. Drizzle the grape seed oil over the fries and use your hands to make sure all fries are coated.
  4. Once all of the fries are coated in the oil, spread them out in a single layer on your pan.
  5. Next sprinkle the dry seasonings on the fries.
  6. Bake for about 20 minutes (depending on the thickness of your fries) until they are a light golden brown color.
  7. Cool them slightly and serve!

If you are in a rush for time, frying them in your grape seed oil is a quick option. On weeknights when we are often rushed, I will go this route. Either way, the taro comes out crunchy and full of flavor! ENJOY!

Wednesday, April 16, 2014

Slacking and Snacking

I haven't truly been slacking with this blog, it just SEEMS that way because I haven't posted anything new as of late.

But the truth is that I have been pretty busy in the kitchen. I'm trying out new recipes and trying to dial in some changes before I share them with you here. I am [--- this close ---] to having things ready to share on at least 2 or 3 different recipes. But we've got to eat the results from my previous experiments before we can try again and make sure before I commit to posting them here.

In the mean time, I'd like to talk about snacks.

And I'll admit that this has been one of the tougher transitions to our Paleo-ish lifestyle. When you think about snacks, you want something quick, easy, and satisfying. And when you are avoiding sugary, pre-packaged foods, this can be a bit of a challenge. But we have found a few things that help to satisfy when we get a case of the munchies.
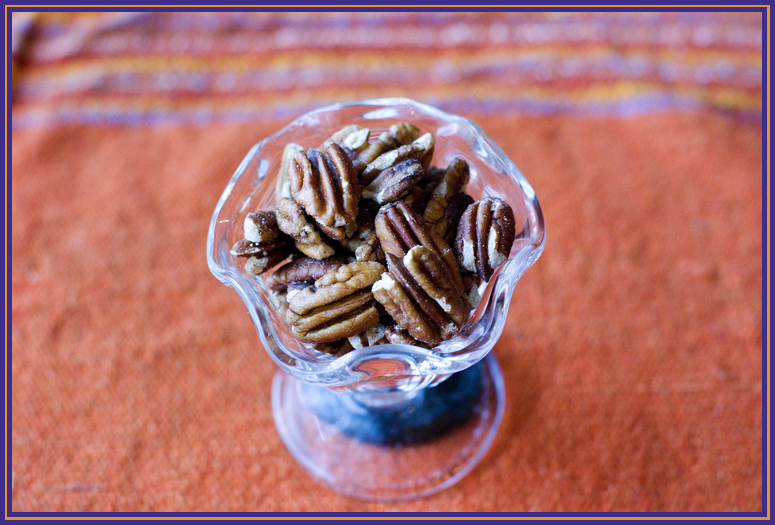
Nuts:
Our first go-to snack has been (& will likely continue to be) nuts. They're easy to take along with you, can be spiced for add flair, and are just an EASY way to add a few bonus calories to your day. Nuts are packed with protein and when seasoned just right can take the edge off of even a serious junk food craving.
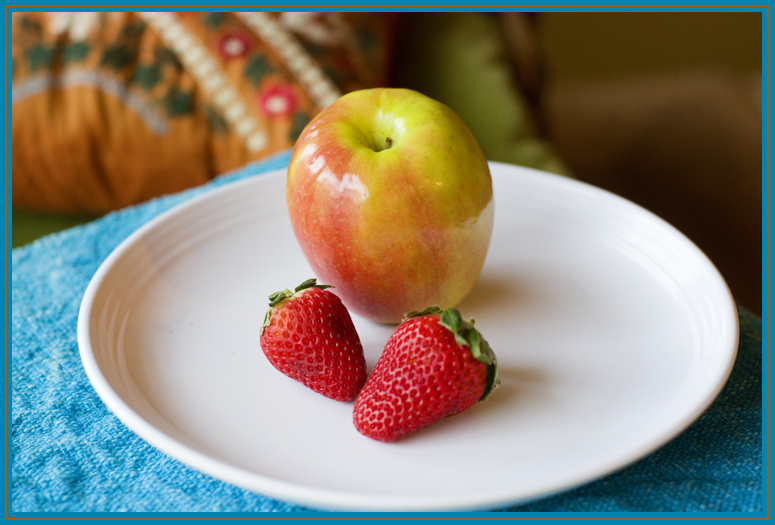
Fruit:
After nuts, you'll often find us reaching for fresh fruit, nature's candy. In fact, we all enjoy at least one fruit snack per day. Personally, I prefer to mix a few fruits together in something resembling the fruit cocktail cups my mom packed in my lunch as a 3rd grader. I like to mix tart fruits (like black berries and raspberries) with something sweet (like strawberries, pineapple and/or peaches). The only drawback to this is that you have to keep a fair bit of fruit on hand (which means you have to take care to eat it all before it goes bad) and it takes a bit of prep time to put it all together. It's not a lot of time, but it's definitely more than grabbing a handful of almonds or tearing straight into an apple on its own.
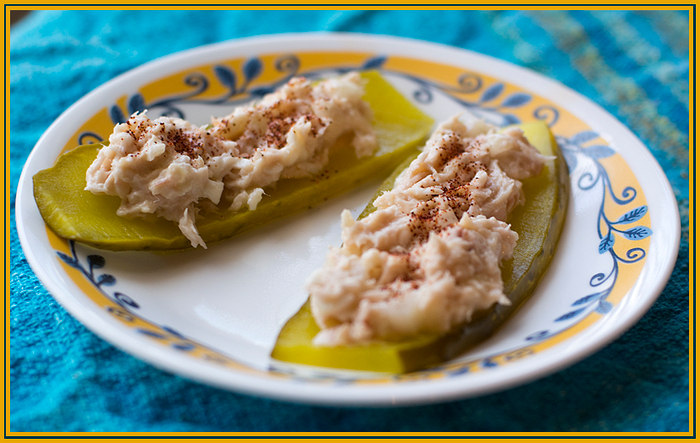
Tuna:
Another snack I truly enjoy, but that again requires some prep time, are tuna wraps/boats. My mom makes the most amazing tuna salad I've ever enjoyed and this version comes pretty close to her original. The trick (for me) is to always make sure I sprinkle the top with a bit of smoky paprika. That added kick always makes this dish just sing, if you ask me. I will wrap up my tuna in a lettuce leaf, plop it on top of pickle slices (see below), or even use it as a dip for apple slices. If I have a Paleo bread on hand, I'll even enjoy it my favorite way - as a toasted sandwich. Once you get past the initial preparation time, this is a snack that will come together quickly when you need a quick bite and as a bonus, if you make a good bit of it at once (I like to use the "family size" cans of tuna) then you can keep it on hand for a few days at a time (unless you go nuts and eat it all at once - which I wouldn't advise, no matter how tasty you make it).
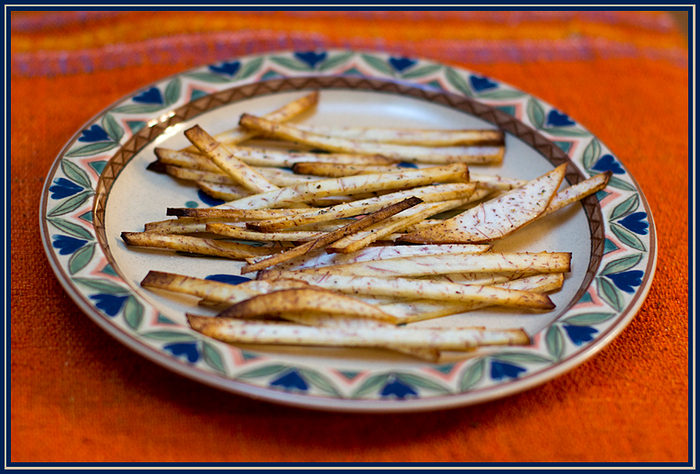
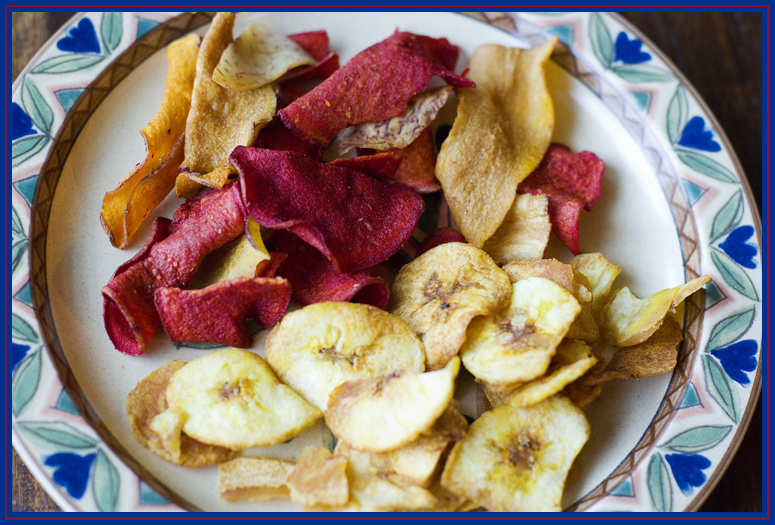
Chips:
At this point, I'm starting to reach when it comes to quality snacks. But we try to keep at least a bag or two of Paleo-friendly chips in the pantry. Our favorites are plantain chips, lightly salted. We will sometimes keep sweet potato chips on hand (I like to crush them and add them to several recipes as well). And then from time to time, we enjoy an "exotic mix" of taro, parsnip, sweet potato, and batata chips from our local grocery store. We can (& do) make most of these chips from scratch on our own from time to time, but when you just want a quick bite of something to keep you from cheating, going through the process of making your own rarely happens (at least in my kitchen). So having something like this on hand really helps. A word of caution though ... this is one of those cases where you REALLY need to read your labels. Most spiced chips (spiced with anything other than sea salt, that is), will likely contain sugar. It really narrows down your chip choices, but we have found at least 2-3 brands of chips in our local store that fit the bill. Just don't skip on reading those labels!

There are many more snacks, of course, but I have found that these are the ones we turn to most often. These require little or no preparation, will satisfy a particular taste (fruit for sweet, tuna for a snappy treat, chips when a salt craving hits, and nuts for a more filling snack), and are regular staples in our kitchen.