Monday, January 27, 2014

Fabulous Flat Bread

One of the hardest adjustments I have had in switching to a primarily grain-free diet has been the loss of bread at my meals. And of the breads I have had to abandon, tortillas were probably the hardest. Sure, I love a good yeast roll as much as the next gal, but to be honest, I rarely had those in the house. However, tortillas were featured in about 3 of every 5 meals I made. So you can understand why the loss has frustrated me.

I've tried my hand at a number of Paleo breads and such. And while I've found a few that I like, in general they still pale in comparison to the "real thing."

That is, until I stumbled on this recipe from Ashley over at My Heart Beets.


Ashley's recipe is as easy as it is yummy! Which means adding it to a meal only takes a few extra minutes and the result is SO worth it. Be sure to click on over and check out her original recipe as I make a couple of changes that suit our family a bit better.

Fabulous Flat Bread

Stuff You Need:
  • almond flour (in equal proportion to the tapioca flour)
  • tapioca flour (in equal proportion to the almond flour)
  • milk
  • salt (optional)
What To Do:
  1. Put almond flour and tapioca flour in a bowl and combine - I use a wire whisk for this.
  2. Stir in milk until it reaches the consistency of pancake batter.
  3. Heat a nonstick pan over medium heat and pour batter to desired thickness.
  4. Once the batter fluffs up and looks firm/mostly cooked, flip it over to cook the other side.
OK. So unlike Ashley's recipe and my usual post, you'll notice there are no quantities listed.

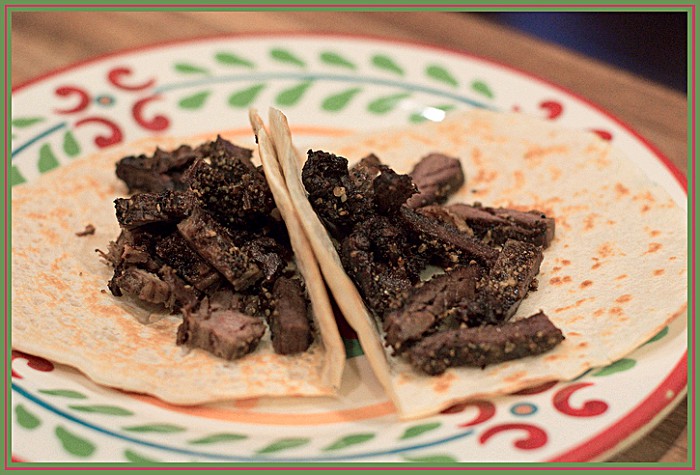
First off, Ashley's recipe makes only 2 servings and as a family of 3, I typically need a bit more than that. Secondly, I tend to prepare this as a substitute for tortillas. And as such, I tend to thin out my batter just a bit more than originally suggested. And lastly, Ashley's recipe features full fat coconut milk. And as I have admitted before, I just don't care for coconut milk (or almond milk for that matter). We have kept regular dairy milk in our diet, so that is why you see it here. You should note that coconut milk tends to be thicker, so you will end up needing more of it than dairy milk - check out Ashley's version for the proportions she uses. SO ... that's a drawn out way to say, in this case, I like doing this by sight rather than exact measure.

I tend to use ¾ cup each of almond flour and tapioca flour. To that I will add about ½ cup of milk. It may take a little more or a little less, so I will usually start with ¼ cup of milk, mix that up with the dry ingredients, and then add more as needed until my batter is slightly thinner than pancake batter. Thinning out the batter makes it easier to prepare a nice, thin tortilla-like flat bread.

Next we need to talk about the salt. You'll note that it is marked optional. When I prepare this flat bread as a tortilla substitute, the salt is absolutely necessary! And in that case, I will add about ¼ tsp to the flour mixture before pouring the milk. If I am making this to serve with jam and nut butter (a FANTASTIC way to enjoy this bread, btw) then I like to leave it out. Without the salt, you get to enjoy a nice sweet taste that pairs very well with nut butter and/or jam.

This flat bread is quick and easy. It fills a void that has been sorely missed in my meals. And it tastes OUT OF THIS WORLD!

I hope you will enjoy it as much as I have!

Wednesday, January 22, 2014

Elena's Primal Chocolate Chip Cookies

Because sometimes you just need a chocolate chip cookie.

I needed one on Monday night. I was feeling ... under the weather ... and I wanted a sweet treat to end the day on a better note.

This is my go-to cookie recipe, it comes from Elena's Pantry and even Wonder Boy swears it's his favorite cookie ever. We served it at Christmas (to family we knew did not have nut allergies) and they all raved about it. This is the kind of recipe that you never feel like you're missing out on the "real deal."

As usual, I highly recommend checking out the original recipe over at Elena's site. I am only posting it here so that if I ever lose that bookmark, I will still be able to find it here.

Elena's Chocolate Chip Cookies

Stuff You Need:
  • 2 cups blanched almond flour
  • ¼ teaspoon celtic sea salt
  • ½ teaspoon baking soda
  • ¼ cup butter, softened (you can substitute vegan shortening or coconut oil)
  • 2 tablespoons honey
  • 1 tablespoon vanilla extract
  • ½ cup chocolate chunks
What To Do:
  1. Put almond flour, salt and baking soda in a food processor & pulse to combine.
  2. Pulse in shortening, honey and vanilla until dough forms.
  3. Remove blade from the processor and stir in chocolate chunks by hand.
  4. Scoop dough one level tablespoon at a time onto a parchment lined baking sheet.
  5. Press balls of dough down gently and bake at 350° F for 6 - 8 minutes or until they are a nice golden brown color.
  6. Now this is the hard part ... let the cookies cool for 15 minutes. They taste better after they have set up a bit and they crumble if you try to pick them up too soon. But they are worth the wait, so hang in there!

Tuesday, January 14, 2014

Chocolate Dipped Cherry Pie Bites

O.M.G.! These are just WAY TOO AWESOME to not share with any- and everyone within earshot (blog-shot?).

This is not my recipe, I'm only copying it here so that I don't loose my book mark to it some day. I added only one step (the chocolate part, big surprise, right?), but I strongly suggest that you jump over to Our Paleo Life to check out this and all the other inspiring recipes right from the source!

OK ... so on to the good stuff!

Chocolate Dipped Cherry Pie Bites

Stuff You Need:
  • 10 Medjool Dates, pitted
  • 1 cup almonds
  • 1 cup dried cherries
  • up to 1 Tbs water
  • ½ cup dark chocolate chips
What To Do:
  1. Combine all ingredients (except water & chocolate), in the order listed, in the bowl of a food processor.
  2. Process until mixture resembles coarse gravel.
  3. While the processor is running, add a thin stream of water, about 1 Tbsp, maybe less depending on the moistness of your dates.
  4. Stop the processor and check the mixture inside. If it sticks together when you smush it, then you’ve got the right consistency. If it’s still crumbly, add more water. You don’t want to add too much water because the bites will be too sticky.
  5. When you’ve got the right consistency, roll mixture into tablespoon-size balls, and place on sheet of parchment paper.
  6. Melt your chocolate chips. You can use a double boiler, but since this really isn't a lot of chocolate, I tend to use the microwave on low, 20 seconds at a time until all is melted.
  7. Dip the cherry pie bites one at a time in your chocolate and place back on the parchment paper.
  8. Once the chocolate is set (it only takes a few minutes) you can store these in an airtight container in the refrigerator for about a week (if they last that long)

I'll be honest, when we made these last night, we didn't wait for the chocolate to set. As soon as they came out of the chocolate, we were popping them in our mouths! And we were not disappointed. This is a really nice sweet treat.

In the future, we may try using roasted pecans instead of the almonds. I'll bet this would work VERY WELL with dried blue berries as well. And maybe, just maybe, a dash of sea salt on top of the chocolate to further enhance this decadent treat. Oh the possibilities!

Wednesday, January 8, 2014

Oh So Easy Spaghetti Squash & Meatballs

Pasta is another one of those foods that I always associate with comfort eating. And I have to admit that I was worried this would be one comfort food I would just have to learn to live without.

Enter the humble spaghetti squash. I was dubious when I picked it up for the first time. I'm not a fan of most squash dishes, but I was craving some meatballs in marinara sauce with noodles and this seemed like the best place to start to feed that fix.

I found this recipe over on the Paleo Pot blog that looked both appetizing and easy. So I went straight to the produce department and grabbed up a spaghetti squash for my first experiment.

I am not going to re-post the recipe here because I didn't change anything the first go around. It's easy and yummy and I highly recommend it. So click on the link and check it out for yourself.

With that said, I'm going to post the slightly different approach here that I have adopted. Ya see, as easy as the original recipe, I found a way to make it both easier and more complicated. Let me explain...

My local grocery store carries a jarred marinara sauce sweetened with honey and without any "forbidden" ingredients. So I stopped making the marinara from the original recipe. And then, to change things up some more, I started making my meatballs separately. First off, I was only able to fit about 6 meatballs in the crock pot with my squash, so I always ended up making more anyway. And then my better half bought me an awesome meatball pan that I just fell in love with and makes meatball preparation a breeze! And then to veer a bit further from the starting recipe, I found the Italian sausage a bit salty so I went back to beef for my meatballs.

In the end, I guess about the only part of the original recipe that I have kept is that I steam the spaghetti squash in the crock pot with the marinara. It works great and is very little fuss on my part to prepare the squash.

Anyway ... without further ado, this is my version of things ...

Oh So Easy Spaghetti Sauce & Meatballs

Stuff You Need:
  • 1 medium spaghetti squash
  • 2 jars HEB Texas Marinara
  • 1 lb extra lean ground beef
  • 8 oz chorizo, casing removed
  • 1 cup minced onion
  • ½ cup diced bell pepper
  • 2 cloves minced garlic
  • ½ tsp oregano
  • ½ tsp chile powder
  • 1 Tbs roasted bell pepper & chipotle spread (you can substitute adobo sauce here)
  • 2 Tbs yellow mustard
  • 2 Tbs agave ketchup
  • black pepper and salt to taste
What To Do:
  1. Dump both jars of marinara in a 6-8 quart crock pot.
  2. Cut the squash in half (crosswise), scoop out seeds, and place cut side down in the marinara.
  3. Cook on low for 5 hours.
  4. About an hour before the squash is done preheat your oven to 350F degrees. If you prefer you can prepare these a day ahead and just reheat when ready to use them.
  5. In a large bowl, mix the remaining ingredients. It's messy, but using your hands is the best way to get everything distributed just the right way.
  6. Roll into meatballs and bake for 30-45 minutes (depending on how thick you want your meatballs).
  7. Remove the squash from the crock pot and use a large fork to pull the spaghetti out. It will resemble the size and texture of angel hair noodles.
  8. Ladle the marinara on top of the squash, top with meatballs, and DIG IN!

This recipe makes quite a lot of "noodles." I typically get 6-8 servings of spaghetti out of one medium squash. And thankfully it holds up really well if you reheat it in the microwave which makes this a favorite for week day lunches.

On top of the ease of this recipe, it turns out that spaghetti squash is quite tasty! It has a slight sweet flavor to it, but nothing strong enough to compete with the tang of the marinara. So in the end, we ended up with a great, easy recipe that we all can enjoy and I can return another comfort food to my list of go-to dishes.

Tuesday, January 7, 2014

Paleo-strone (hearty winter soup)

When the weather turns cold, it just feels natural to me to find comfort in a big steaming bowl of soup (or chilli or BOTH). And one of my all time favorite comfort soups is minestrone. However, minestrone is loaded with pasta and other things not currently on the menu. So I had to improvise. The following is what I came up with and it has become my current favorite cold weather meal!

Paleo-strone (vegetable beef soup)

Stuff You Need:
  • 1 Tbs olive oil
  • 1 sweet potato, julienned
  • 1 cup carrots, julienned
  • 1 zucchini squash, julienned
  • 1 yellow bell pepper, chopped
  • 1 red bell pepper, chopped
  • 2 shallots, minced
  • 2 cloves garlic, minced
  • 1 lb ground beef
  • ½ lb Italian sausage
  • 28 oz can diced tomatoes with juice
  • 14 oz beef broth
  • 2 tsp dried oregano
  • 1 tsp basil
  • ½ tsp cayenne pepper
  • ½ tsp sea salt
  • 1 tsp black pepper
  • ½ tsp salt (optional - the Italian sausage has a good bit of salt so feel free to omit)

What To Do:
  1. Brown ground beef and sausage in a skillet until no pink remains, remove from heat, drain the fat and set aside.
  2. Place the olive oil in the bottom of a 4-6 quart stock pot.
  3. Add the prepared sweet potato, carrots, zucchini, shallots, and garlic and saute for about 1 minute, stirring often.
  4. Pour in canned tomatoes and broth.
  5. Add the spices and stir it all together.
  6. Add in the cooked beef/sausage and let simmer on low for 45 minutes to an hour.
    Note: this dish can also be combined in a crock pot and cook on low for 6 hours.


Note: you don't have to julienne the veggies. They could easily be chopped (just a rough chop, the small size is not necessary). I personally like to prepare them this way because the long strings of sweet potato and zucchini resemble the pasta I associate with traditional minestrone.

One of the best parts of this recipe (imho) is that you can pretty much make into whatever you want. If you would like to add some crunch, add a bit of chopped celery. I am told that chopped spinach (½ cup) or kale also works really well. If you want to switch out yellow onions for the shallots because that is what you have on hand, or maybe you have a couple of mushrooms in the fridge, feel free to make your substitutions!

The truth is, this is just a good, hearty, clean out the fridge/pantry kind of soup. And no matter how you mix it up, it is sure to satisfy!